jekyll에서 Bootstrap 4 사용하기
bootstrap4 는 2017-6월 현재 alpha 버전으로 jekyll 과 github page에 적용하기 위해서 몇가지 구성과 설정을 해주어야 한다.
bootstrap 4 gem 추가
bootstrap4는 sass를 지원하고, 실제 sass 파일을 추가하거나 gem으로 설치하는 두 가지 방법으로 설치한다.
- (1) sass 소스 파일 추가
- (2) Gem 으로 설치
만약 bootstrap 3를 사용한다면 Bootstrap 3은 Less로 작성되었고, Jekyll은 Sass를 지원한다.[^3]
여기서는 Bootstrap Ruby gem 으로 설치한다
bootstrap gem을 설치하고 설정을 한 후에 github page에서 사용하기 위해 마지막 섹션에 설명한 것 처럼 bootstrap scss 파일을 복사하는 과정을 거친다.
Gemfiles
Gemfile 파일을 열고 bootstrap, autoprefixer-rails, jekyll-assets gem을 추가한다. [^2]. 또한 Gemfile 에서 minima 테마 gem을 막는다.
1
2
3
4
5
6
7
| # gem "minima", "~> 2.0"
group :jekyll_plugins do
gem "jekyll-feed", "~> 0.6"
gem 'bootstrap', '~> 4.0.0.alpha4'
gem 'autoprefixer-rails'
gem 'jekyll-assets'
|
- autoprefixer-rails: Autoprefixer for Ruby and Ruby on Rails
- jekyll-assets: Jekyll을 위한 Sprockets 3 사용한 Asset pipelines.
_config.yml
_config.yml 을 열고, minima 사용을 막는다.
1
2
3
4
5
6
| #theme: minima
gems:
- jekyll-feed
- bootstrap
- autoprefixer-rails
- jekyll-assets
|
새로 추가한 bootstrap gem을 bundle 명령으로 설치한다.
assets/main.scss
assets/main.scss 파일에 minima를 사용하지 않고, bootstrap에서 사용할 scss 파일을_sass/ 폴더에 작성한다.
1
2
3
4
5
| //@import "minima";
@import "bootstrap";
@import "_custom"; // before 'main', variables for bootstrap
@import "main";
@import "blog";
|
- @import “bootstrap” 은 bootstrap gem을 통해 scss 소스를 읽어 온다.
여기서는 _custom.scss 파일은 bootstraps 변수, blog.scss 파일은 블로그 테마를 구성하도록 추가해서 구성했다.
_sass/custom.sass 파일
이 파일은 bootstrap4 scss _variables 에 있는 변수를 다시 정의한다. 다음 같다 [^2]
1
2
3
4
5
6
7
8
9
10
11
12
13
14
15
16
17
18
19
20
21
22
23
24
25
26
27
28
| // Bootstrap overrides
// Options
$enable-flex: true;
$enable-rounded: false;
$enable-shadows: false;
$enable-gradients: false;
$enable-transitions: true;
// Typography
@font-face {
font-family: "NotoSansCJKkr-Regular";
src: url( '../assets/fonts/NotoSansCJKkr-Regular.otf') format( 'opentype');
}
@font-face {
font-family: "NotoSansCJKkr-Bold";
src: url( '../assets/fonts/NotoSansCJKkr-Bold.otf') format( 'opentype');
font-style: bold;
}
@font-face {
font-family: "NotoSansCJKkr-Light";
src: url( '../assets/fonts/NotoSansCJKkr-Light.otf') format( 'opentype');
}
$base-font-family: "NotoSansCJKkr-Regular", "Helvetica Neue", Arial, sans-serif !default;
$font-family-sans-serif: -apple-system, BlinkMacSystemFont, "Segoe UI", Roboto, "Helvetica Neue", Arial, sans-serif;
$font-family-base: $font-family-sans-serif;
|
_sass/main.scss 파일
여기서 main.scss 에서는 TAG에 대한 전체적인 구성을 했다. minima 에서 가져온 코드등이 혼재한다.
1
2
3
4
5
6
7
8
9
10
11
12
13
14
15
16
17
18
19
20
21
22
23
24
25
26
27
28
29
30
31
32
33
34
35
36
37
38
39
40
41
42
43
44
45
46
47
48
49
50
51
52
53
54
55
56
57
58
59
60
61
62
63
64
65
66
67
68
69
70
71
72
73
74
75
76
77
78
79
80
81
82
83
84
85
86
87
88
| /*
* Globals
*/
@media (min-width: 48em) {
html {
font-size: 18px;
}
}
@mixin media-query($device) {
@media screen and (max-width: $device) {
@content;
}
}
@mixin relative-font-size($ratio) {
font-size: $font-size-base * $ratio;
}
// Width of the content area
$on-palm: 600px !default;
$on-laptop: 800px !default;
$background-color: #fdfdfd !default;
$spacing-unit: 30px !default;
$footer-height: 4.5rem;
$small-font-size: $font-size-base * 0.875 !default;
$base-line-height: 1.5 !default;
$my-body-font: "NotoSansCJKkr-Regular", "Helvetica Neue", Arial, sans-serif !default;
/*
* TAG
*/
html {
position: relative;
min-height: 100%;
}
body {
font: $font-weight-base #{$font-size-base}/#{$base-line-height} $my-body-font;
color: #111;
background-color: $background-color;
}
h1, .h1,
h2, .h2,
h3, .h3,
h4, .h4,
h5, .h5,
h6, .h6 {
font-family: "Helvetica Neue", Helvetica, Arial, sans-serif;
font-weight: normal;
color: #333;
}
table, td, th {
border: 1px solid #003300;
}
table {
border-collapse: collapse;
border-spacing: 0;
}
th {
border: 2px solid black;
}
td {
padding: 1px 2px;
}
/*
* Syntaxhighliting from minima
*/
%vertical-rhythm {
margin-bottom: $spacing-unit / 2;
}
// Import partials from minima
@import
"minima/syntax-highlighting"
;
|
마지막엔 아직 다른 syntaxhighter를 설치 안하고 기존 minima에서 사용하던 syntaxhighliter 를 사용하게 했다.
layout 파일
_include/head.html 파일
1
2
3
4
5
| <link rel="stylesheet" href="{{ "/assets/main.css" | relative_url }}">
<link
rel="stylesheet"
href="https://maxcdn.bootstrapcdn.com/font-awesome/4.6.3/css/font-awesome.min.css"
/>
|
_layout/default.html 파일
footer.html 구문 밑에 bootstrap 관련 스크립을 추가한다.
1
2
3
4
5
6
7
8
9
10
11
12
13
14
15
16
17
18
19
20
| {% include header.html %}
<div class="container-fluid">
<div class="row">{{ content }}</div>
</div>
{% include footer.html %}
<script
src="https://code.jquery.com/jquery-3.1.1.slim.min.js"
integrity="sha384-A7FZj7v+d/sdmMqp/nOQwliLvUsJfDHW+k9Omg/a/EheAdgtzNs3hpfag6Ed950n"
crossorigin="anonymous"
></script>
<script
src="https://cdnjs.cloudflare.com/ajax/libs/tether/1.4.0/js/tether.min.js"
integrity="sha384-DztdAPBWPRXSA/3eYEEUWrWCy7G5KFbe8fFjk5JAIxUYHKkDx6Qin1DkWx51bBrb"
crossorigin="anonymous"
></script>
<script src="https://maxcdn.bootstrapcdn.com/bootstrap/4.0.0-alpha.6/js/bootstrap.min.js"></script>
|
header.html 을 bootstrap navbar 형태로 다음 같이 변경한다.
1
2
3
4
5
6
7
8
9
10
11
12
13
14
15
16
17
18
19
20
21
22
23
24
25
26
27
| <nav class="navbar navbar-toggleable-sm navbar-inverse bg-inverse bg-faded fixed-top">
{% assign default_paths = site.pages | map: "path" %}
{% assign page_paths = site.header_pages | default: default_paths %}
<button class="navbar-toggler navbar-toggler-right" type="button" data-toggle="collapse"
data-target="#nav-content" aria-controls="nav-content" aria-expanded="false" aria-label="Toggle navigation">
<span class="navbar-toggler-icon"></span>
</button>
<a class="navbar-brand" href="{{ "/" | relative_url }}">{{ site.title | escape }}</a>
{% if page_paths %}
<div class="collapse navbar-collapse justify-content-end" id="nav-content">
<ul class="navbar-nav">
{% for my_page in site.pages %}
{% if my_page.title %}
<li class="nav-item">
<a class="nav-link" href="{{ my_page.url | prepend: full_base_url }}">{{ my_page.title | escape }}</a>
</li>
{% endif %}
{% endfor %}
</ul>
</div>
{% endif %}
</nav>
|
navbar에서 참조한 구현 사례는 여기 샘플을 참조한다.
1
2
3
4
5
6
7
8
9
10
11
12
13
14
15
16
17
18
19
20
21
22
23
24
25
26
27
28
29
30
31
32
33
34
35
36
37
38
39
40
41
42
43
44
45
46
47
| <footer class="footer">
<h3>{{ site.title | escape }}</h3>
<div class="row">
<div class="col-md-3 footer-col">
<ul class="contact-list">
<li>
{% if site.author %}
{{ site.author | escape }}
{% else %}
{{ site.title | escape }}
{% endif %}
</li>
{% if site.email %}
{% comment %}<li><a href="mailto:{{ site.email }}">{{ // site.email }}</a></li>{% endcomment %}
{% endif %}
</ul>
</div>
<div class="col-md-3 footer-col">
<ul class="social-media-list">
{% if site.github_username %}
<li>
{% include icon-github.html username=site.github_username %}
</li>
{% endif %}
{% if site.twitter_username %}
<li>
{% include icon-twitter.html username=site.twitter_username %}
</li>
{% endif %}
</ul>
</div>
<div class="col-md-5 footer-col">
<p>{{ site.description | escape }}</p>
</div>
</div>
</footer>
{% if page.comments %}
<!-- Disqus comment count -->
<script id="dsq-count-scr" src="//{{ site.disqus.shortname }}.disqus.com/count.js" async></script>
{% endif %}
|
{% raw %}
### \_layouts 파일
bootstrap 클래스로 감싼다.
1
2
| <div class="container-fluid">
<div class="row">
|
home.html 파일,
{% raw %}
1
2
3
4
5
6
7
8
9
10
11
12
13
14
15
16
17
18
19
20
21
22
23
24
| <div class="container-fluid">
<div class="row">
<h1 class="page-heading">Posts</h1>
{{ content }}
<ul class="post-list">
{% for post in site.posts %}
<li>
{% assign date_format = site.minima.date_format | default: "%b %-d, %Y" %}
<span class="post-meta">{{ post.date | date: date_format }}</span>
<h2>
<a class="post-link" href="{{ post.url | relative_url }}">{{ post.title | escape }}</a>
</h2>
</li>
{% endfor %}
</ul>
<p class="rss-subscribe">subscribe <a href="{{ "/feed.xml" | relative_url }}">via RSS</a></p>
</div>
</div>
|
{% endraw %}
bootstrap gem과 github pages
github page에 올리기 위해서 gem 설치한 bootstrap themem 파일이 필요하다. 로컬에서는 bootstrap gem 으로 bootstrap의 scss 소스를 사용하지만 github page에서는 실제 scss 파일이 함께 저장소에 있어야 한다.
먼저 다음 같이 bootstrap gem 위치로 이동한다.
1
2
| $ cd `bundle show bootstrap`
/usr/local/lib/ruby/gems/2.4.0/gems/bootstrap-4.0.0.alpha6 $
|
스타일 시트 파일을 로컬 _scss 폴더 밑으로 복사한다.
1
2
| $ cd assets/stylesheets
$ cp -r * ~/work-blog/qkboo-github-work/_sass/
|
Gemfile, _config.yml
bootstrap gem 사용을 막는다.
mamima 테마 삭제
minima 테마를 사용하지 않으므로 관련 파일이 있으면 삭제한다.
deleted:    _sass/minima.scss
deleted:    _sass/minima/_base.scss
deleted:    _sass/minima/_layout.scss
단, _sass/minima/_syntax-highlighting.scss 는 일단 유지하자.
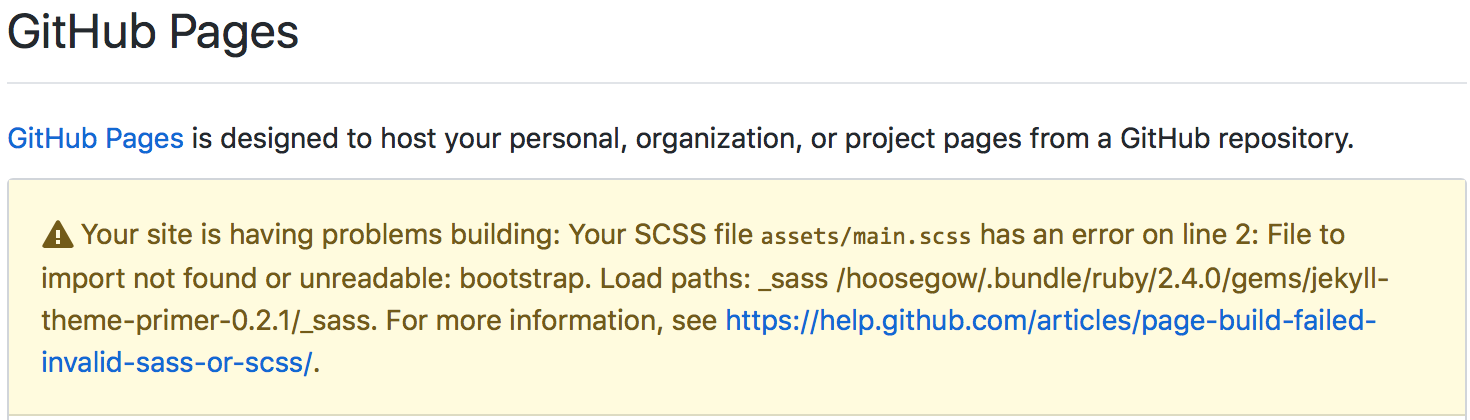
github page update 문제
jekyll 등에서 작업한 내용을 push 했지만 github page 내용이 변경되지 않는 경우, scss 파일 등에 에러가 있을 수 있다. 해당 페이지 프로젝트의 Settings -> Github pages 섹션에 에러가 표시된다.
 {: width=”500”}
참조
[^1]: Bootstrap for Sass
[^2]: Bootstrap 4 + Jekyll
[^3]: Using Bootstrap CSS with Jekyll