Ubuntu 20.04 - Cheat sheet

Ubuntu 20.04 를 설치/운영하면서 필요한 팁/트릭과 쓸모있는 사용법을 정리한다.

비슷한 문서:

Timezone 관련

CLI에서 설정을 할 수 있다.

timedatectl timedatectl 명령으로

1
2
3
4
5
6
$ timedatectl list-timezones
...
Asia/Seoul
...

$ sudo timedatectl set-timezone Asia/Seoul

만약 손으로 수정을 한다면,

timedatectl 로 지정되는 설정 Timezone/etc/localtime 이라는 바이너리로 저장되므로
명령행에서 지원하는 timezone을 복사할 수 도 있다고 한다..

1
$ sudo cp /usr/share/zoneinfo/Europe/London /etc/localtime

LCD/Screen off

기존에 글 Ubuntu/시스템 전원관리, 2017년 에서 Ubuntu 18.x 에서 디스플레이(특히 노트북 LCD)를 끄기 위해서 사용되던 직접 vbetool 명령으로 동작하지 않는다.

그래서 Ubuntu 20.04 에서는 링크 ubuntu-20-04-on-a-laptop-is-there-any-way-toturn-off-the-screen 에 있는 방법으로 사용하고 있다.

디스플레이를 끄려면

1
2
3
sudo mount -o remount,exec /dev
sudo vbetool dpms off
sudo mount -o remount,noexec /dev

다시 디스플레이를 켜려면

1
2
3
sudo mount -o remount,exec /dev
sudo vbetool dpms on
sudo mount -o remount,noexec /dev

Network 상태 확인

ss 명령

ss 명령은 Socket Statistics 를 출력해 준다. open 된 소켓에 대한 정보를 표시한다.

1
2
3
4
5
6
7
8
9
10
11
12
13
14
ss [-a -t -u -l -p -n] [filter]

-a:
-t: TCP
-u: UDP
-l: LISTEN 상태 포트
-n: 호스트/포트/사용자 이름을 숫자로 표시
-p: 프로세스 이름
-r, --resolve: resolve host names
-w, --raw : display only RAW sockets
-x, --unix : display only Unix domain sockets
-4, --ipv4 : display only IP version 4 sockets
-6, --ipv6 : display only IP version 6 sockets
-m, --memory : show socket memory usage

LISTEN Port 확이

netstat 같이 LISTEN 상태 프로세스를 확인할 수 있다. 다음은 t: tcp 포트, l: LISTEN 상태의 소켓 정보를 출력한다.

1
2
3
4
5
6
7
8
9
10
$ ss -lntu
Netid State Recv-Q Send-Q Local Address:Port Peer Address:Port Process
udp UNCONN 0 0 127.0.0.53%lo:53 0.0.0.0:*
udp UNCONN 0 0 12.42.168.213%enp3s0:68 0.0.0.0:*
tcp LISTEN 0 511 0.0.0.0:80 0.0.0.0:*
tcp LISTEN 0 4096 127.0.0.53%lo:53 0.0.0.0:*
tcp LISTEN 0 10 127.0.0.1:9000 0.0.0.0:*
tcp LISTEN 0 511 0.0.0.0:443 0.0.0.0:*
tcp LISTEN 0 128 0.0.0.0:53000 0.0.0.0:*
tcp LISTEN 0 128 0.0.0.0:2020 0.0.0.0:*

IPv4, IPv6 소켓

1
2
3
4
5
6
7
8
9
$ ss -tl4
State Recv-Q Send-Q Local Address:Port Peer Address:Port Process
LISTEN 0 511 0.0.0.0:http 0.0.0.0:*
LISTEN 0 511 0.0.0.0:https 0.0.0.0:*
$
$ ss -tl6
State Recv-Q Send-Q Local Address:Port Peer Address:Port Process
LISTEN 0 128 [::]:2020 [::]:*
q

lsof

Linux에서 open file을 확인하는데 사용되는 lsof 명령입니다. Unix/Linux의 모든 것은 파일로 이루어져있기때문에 스트림이나 네트워크 파일도 lsof 로 확인할 수 있습니다.

1
2
$ lsof -i
$ lsof -l

Ubuntu/시스템 전원관리, 2017년

Docker CLI 요약

docker cli 명령을 정리

docker architecture 이미지 소스

비슷한 문서:

docker cli

docker cli는 docker 명령 뒤에 docker commands 로 도커를 제어한다. 그리고 대상 컨테이너를 지정하고 컨테이너에서 실행 할 수 있는 명령형식으로 구성되어 있다.

1
docker [docker commands] [container] [container command] 

Use the Docker command line docker

search 이미지 검색

Docker hub에서 이미지를 검색한다.

1
docker search busybox

Docker hub에서 상위 몇개 정도만 검색하고 싶을때 limit 옵션을 사용한다.

1
docker search busybox --limit 5

Docker hub에서는 이미지 중 별점을 검색한다.

1
2
3
4
5
# 최소 별정 50인 이미지
docker search busybox --filter=stars=50

# 별점이 3인 이미지
docker search --filter stars=50 busybox

정규 빌드 버전만 지시하려면 is-official 옵션 사용

1
2
docker search --filter is-official=true --filter stars=50 busybox

--format 옵션을 사용해 출력되는 내용을 필터링 할 수 있다. 다음은 별점만 출력하는 예이다.

1
docker search --format "{{.Name}}: {{.StarCount}}" nginx

pull 이미지를 다운로드 한다

Docker image를 내려 받는다. 이미지 이름 뒤에 :[version] 을 붙이면 지정한 버전을 내려 받고, latest 를 붙이면 최신 버전을 대상으로 한다.

1
docker pull nginx:latest

images 다운로드 이미지

Docker에서 다운로드 받는 이미지를 확인한다. docker images는 모든 이미지를 보여준다.

1
$ docker images

특정 이미지만 지시할 수 있다.

1
$ docker images nginx

run 이미지를 컨테이너로 실행한다.

Docker image를 컨테이너로 생성하고, 실행합니다.

1
docker run -p 8080:8080 nginx

옵션:

1
2
3
4
5
`-p`: Local과 Container 와 port를 연결하는 옵션
`-i`: interactive (대화방식)
`-t`: Pseudo-tty (콘솔 및 터미널 환경)
`— name`: 실행 컨테이너 이름을 지정합니다.
`-d`: 백그라운드에서 실행되는 옵션입니다.

docker image를 실행하고 bash 쉘을 연다.

1
docker run -i -t --name nginx nginx bash

ps 컨테이너 목록을 확인

Docker 컨테이너 목록을 확인합니다.

1
2
$ docker ps
$ docker ps -a

옵션:

1
2
`-a` : 실행 중이 아닌 컨테이너까지 확인
`-q` : 컨테이너의 CONTAINER ID 만 표시

start 컨테이너를 시작한다.

중단되어 있는 컨테이너를 실행합니다.

1
2
docker start nginx
nginx

attach 컨테이너 연결

실행중인 Docker Container 의 standard input, output, error streams 에 연결한다.

1
docker attach nginx

docker attach 명령 사용 사례.

exec 컨테이너 명령 실행

Docker Container의 쉘의 명령어을 실행할 수 있다.

1
docker exec nginx ls

옵션

1
2
3
4
5
-d, --detach : 명령을 detach mode, 백그라운드로 실행
-e, --env : 환경변수 설정하고 실행
-it [SHELL]: iteractive tty 옵션. 사용할 shell을 지시한다, 보통 bash
-u, --user: User ID, UID
-w, --workdir: 작업 디렉토리 지정

다음은 nginx 컨테이너의 bash 쉘을 실행한다.

1
docker exec -it nginx bash

다음은 nginx 컨테이너를 qkboo 사용자 쉘로 연결한다.

1
docker exec -it -u qkboo nginx bash

inspect 컨테이너 상세 정보

Docker Container에 상세 정보를 확인 한다.

1
docker inspect nginx

옵션

--format : 필터링

1
docker inspect  --format='{{range .NetworkSettings.Networks}}

logs 명령

Docker 컨테이너에서 sysout 또는 syserr 로그를 보려면 logs 명령을 사용한다.

docker logs

stop 컨테이너 종료

ps 명령으로 실행중인 컨테이너 아이디와 이름을 확인하고 아이디를 준다.

1
2
3
docker ps

docker stop e417951d25fd

이름으로 종료시 --name 옵션 사용

1
docker stop --name nginx2

rm 컨테이너를 삭제한다.

Docker Container 삭제합니다. 삭제할때는 실행 상태가 아닌 컨테이너만 가능합니다.

1
docker rm nginx

강제 삭제시 -f 옵션 사용.

rmi 이미지를 삭제한다.

Docker image를 삭제 하는데 이미지가 중첩된 경우가 많기 때문에 링크 같이 untag 한 후 사용한다.

1
2
3
docker rmi fd484f19954f

docker rmi test2:latest

혹은 -f 옵션으로 중첩된 이미지를 모두 함께 삭제 할 수 있다.

1
docker rmi -f fd484f19954f

참고

HTTPS 를 위한 Private SSL

Web server certificates 과정

Securing a web site with a server certificate 단계

  1. 비밀키를 생성한다.
  2. 비밀키로 CSR certificate siging requests 을 생성한다.
  3. CSR 을 CA 로 사인한다.
  4. 사인한 CERT 를 받고 설치한다.

1. 비밀키를 생성한다.

rsa 를 사용해 4096크기 비밀키를 생성한다.

1
2
3
4
5
# cd /etc/ssl/private 
# openssl genrsa -out my_rsa.key 4096
Generating RSA private key, 4096 bit long modulus (2 primes)

# chmod 0600 private/my_rsa.key
1
# chmod 0600 private/my_rsa.key

Public Key 생성

1
명령: openssl rsa -in [private key 파일명] -pubout -out [파일명]
1
# openssl rsa -in my_rsa.key -pubout -out my_rsa.pub 

2. Create a CSR(certificate signing request) from this key,

인증서 발급을 위한 필요한 정보를 담고 있는 인증서 신청서를 작성한다.

1
명령어 : openssl req -new -key [private key 파일명] -out [파일명]

비밀키에서 CSR 파일 작성을 요청하면 아래 내용을 묻는다.

1
# openssl req -new -sha256 -key ./my_rsa.key -out ./my_rsa.csr 
1
# openssl req -new -key private.key -out private.csr

인증서 발급을 위한 필요한 정보를 담고 있는 인증서 신청 형식 데이터 이다.

  • Country Name (국가코드) KR
  • State or Province Name (시/도의 전체이름) Seoul
  • Locality Name (시/군/구 등의 이름) Songpa-gu
  • Organization (회사이름) XXXX
  • Organization Unit (부서명) Server
  • Common Name (SSL 인증서를 설치할 서버의 Full Domain) www.xxxx.com
      • Common Name 에는 인증서를 설치할 사이트의 도메인의 이름을 넣어야 한다. (ip, port, http, https 포함불가능)

4. CA 인증한 CRT 인증서 만들기

CSR 을 CA에서 인증해 CRT 파일을 생성한다. 여기서는 비밀키와 CSR 요청서를 바탕으로 CRT 인증서를 생성한다.

1
명령어 : openssl req -x509 -days [기간] -key [private key 파일명] -in [csr 파일명] -out [파일명] -days [기간]

x509 를 이용하고 365일 사용 가능한 crt 인증서를 생성한다.

1
openssl req -x509 -days 365 -key my_rsa.key -in my_rsa.csr -out my_rsa.crt -days 365

생성한 혹은 CA에서 받은 CRT 파일은 아래 같이 확인해 볼 수 있다.

1
openssl x509 -text -in yourdomain.crt -noout

5. CRT 파일을 PEM 파일로 변환한다.

1
openssl x509 -in mycommoncrt.crt -out mycommonpem.pem -outform PEM 

[Tip] 인증서 Config 파일 (test.conf)

위에서 만들다 보면 계속 같은 내용을 써야 한다. 그래서 그 부분을 파일로 만들어 놓고 csr, crt 생성할때 사용하면 된다.

1
2
3
4
5
6
7
8
9
10
11
12
13
14
15
16
17
18
19
20
21
22
[req]
default_bits = 2048
prompt = no
default_md = sha256
req_extensions = req_ext
distinguished_name = dn

[dn]
C=KR
ST=Seoul
L=Seoul
O=COMPANY
OU=DEV
emailAddress=test@test.com
CN = testmachine

[req_ext]
subjectAltName = @alt_names

[alt_names]
IP.1 = 111.111.111.111
DNS.1 = test.com

csr 을 생성한다.

1
openssl req -new -key private.key -out private.csr -config test.conf

csr, crt 파일을 생성한다.

1
openssl req -x509 -days 365 -key private.key -in private.csr -out mycommoncrt.crt -days 365 -config test.conf

그리고 이렇게 해서 인증서를 만들었을때 subjectAltName 이 안들어간다 . 그 부분이 필요할 경우에는 이렇게 명령어를 사용하면 된다.

1
openssl req -x509 -days 365 -key private.key -in private.csr -out mycommoncrt.crt -days 365 -config test.conf -extensions req_ext

openssl 팁 몇가지

CRT 파일 확인

openssl x509 -text -noout -in <인증서파일> : 인증서 내용을 볼수 있다.

Verifying Your Keys Match

1
2
3
openssl pkey -pubout -in .\private.key | openssl sha256
openssl req -pubkey -in .\request.csr -noout | openssl sha256
openssl x509 -pubkey -in .\certificate.crt -noout | openssl sha256

NGINX 웹 서버 TLS 암호화 추가

개인키와 TLS 인증서 crt 파일을 사용한다.

1
2
$ sudo mkdir /etc/nginx/tls/private
$ mv my_rsa.key my_rsa.crt /etc/nginx/tls/private
  1. 개인 키는 /etc/nginx/tls/private/my_rsa.key 파일에 저장됩니다.
  2. 개인 키 및 CSR(인증서 서명 요청) 생성 및 CA(인증 기관)에서 인증서 TLS 인증서는
    • /etc/nginx/tls/private/example.com.crt 파일에 저장됩니다.
1
2
3
4
5
6
7
server {
listen 443 ssl;
server_name www.thinkbee.kr;
root /home/qkboo/Home/www/thinkbee.kr/;
ssl_certificate /etc/nginx/tls/private/my_rsa.crt;
ssl_certificate_key /etc/nginx/tls/private/my_rsa.key;
}

참고

  1. Howto – Install a self signed web server certificate
  2. openssl quick reference guide
  3. Openssl로 SSL 을 위한 인증서 발급하기 (HTTPS),blog
  4. Nginx - HTTPS and Certificate SSL,blog
  5. NodeJS와 Nginx 웹 서버,blog

parted로 Partition, Format하기

새 디스크 / USB 저장장치를 리눅스 계열에서 사용하고자 할 때.

디스크 확인 lsblk

lsblk 명령은 디바이스 장치가 마운트 된 곳을 출력해 준다.

1
2
3
4
5
6
7
8
NAME                      MAJ:MIN RM   SIZE RO TYPE MOUNTPOINT
loop0 7:0 0 63.3M 1 loop /snap/core20/1828
loop1 7:1 0 91.8M 1 loop /snap/lxd/23991
sda 8:0 0 119.2G 0 disk
├─sda1 8:1 0 1M 0 part
├─sda2 8:2 0 1G 0 part /boot
└─sda3 8:3 0 118.2G 0 part
└─ubuntu--vg-ubuntu--lv 253:0 0 118.1G 0 lvm /

새 디스크 장치(SSD, HDD, USB 등) 를 붙이고 다시 확인하면 새로운 디스크는 sd[a-z] 형식으로 표현된다.

아래 sdb 는 현재 파티션이 1개 존재하는 상태이다.

1
2
3
4
5
6
7
8
9
10
11
$ lsblk
NAME MAJ:MIN RM SIZE RO TYPE MOUNTPOINT
loop0 7:0 0 63.3M 1 loop /snap/core20/1828
loop1 7:1 0 91.8M 1 loop /snap/lxd/23991
sda 8:0 0 119.2G 0 disk
├─sda1 8:1 0 1M 0 part
├─sda2 8:2 0 1G 0 part /boot
└─sda3 8:3 0 118.2G 0 part
└─ubuntu--vg-ubuntu--lv 253:0 0 118.1G 0 lvm /
sdb 8:16 0 931.5G 0 disk
└─sdb1 8:17 0 931.5G 0 part

[USB 장치]

USB 장치는 mmcblk[0-9] 형식으로 표시된다. 참고 Raspberry Pi:mmcblk

1
2
3
4
5
6
7
8
9
$ lsblk
NAME MAJ:MIN RM SIZE RO TYPE MOUNTPOINT
sda 8:0 0 119.2G 0 disk
├─sda1 8:1 0 84.5G 0 part
└─sda6 8:6 0 28.9G 0 part /
mmcblk0 179:0 0 7.5G 0 disk
├─mmcblk0p2 179:2 0 6.8G 0 part /media/qkboo/ROOT
├─mmcblk0p3 179:3 0 486.1M 0 part
└─mmcblk0p1 179:1 0 200M 0 part /media/qkboo/EFI

parted 사용

파티션 및 포맷을 위해 마운트된 파티션을 언마운트 한다. parted 는 상호작용 프롬프트에서 사용하거나 단일 명령어로 사용할 수 있다.

parted 프롬프트 사용

[ext4 파티션 생성]

1
2
3
4
5
6
7
8
9
10
11
12
13
14
15
16
17
sudo parted /dev/sdb
(parted) print
Number Start End Size File system Name Flags
1 0.00GB 32.0GB 32.0GB

(parted) mklabel gpt
Warning: The existing disk label on /dev/sda will be destroyed and all data on
this disk will be lost. Do you want to continue?
Yes/No? y

(parted) unit GB
(parted) mkpart primary 0 1000.0GB #디스크 크기 입력

(parted) print
Number Start End Size File system Name Flags
1 0.00GB 32.0GB 32.0GB primary lvm
(parted) quit

[fat32 파티션 생성]

USB 스토리지는 아래 같이 나타난다. 다음은 USB 파티션에 fat32 파일시스템을 프롬프트로 생성하고 있다.

1
2
3
4
5
sudo parted /dev/mmcblk0
(parted) mklabel msdos
(parted) mkpart primary fat32 1MiB 100%
(parted) set 1 boot on
(parted) quit

쉘에서 parted 명령 사용

parted 를 쉘 명령으로 사용해 단계별로 파티션을 생성할 수 있다.

1
2
3
sudo parted /dev/mmcblk0 rm 1
sudo parted /dev/mmcblk0 rm 2
sudo parted /dev/sdc mkpart primary ext3 4MiB 100%

Format, Mount & fstab

생성한 파티션에 시스템 지원 파일 시스템을 생성해야 한다. 해당 파일 시스템으로 파티션을 포맷한 후에 지정한 디렉토리에 마운트를 해서 사용하면 된다. 지속적인 사용을 위해서 /etc/fstab 에 파티션을 마운트 포인트로 등록하면 재시동 후에도 동일한 폴더에 마운트 된다.

mkfs

mkfs 명령은 파일 시스템에 따랴서 -t 옵션에 파일시스템을 지시하거나 mkfs.[FS] 형식을 명령을 바로 쓰기도 한다.

다음을 sdb1 파티션을 ext4 로 포맷하고 있다.

1
sudo mkfs -t ext4 /dev/sdb1

[USB vfat 파일시스템 생성]

1
sudo mkfs -V -t vfat /dev/mmcblk0p1

fstab 에 등록

/etc/fstab 에 새로 포맷한 디스크 경로를 추가 한다.

1
2
3
4
5
6
# HDD
/dev/sdb1 /Home2 ext4 defaults 0 1

# USB LV volume
/dev/vg_usb/dbvol /data ext4 defaults 0 1
/dev/vg_usb/workvol /home/pi/work ext4 defaults 0 1

참고

HTTPS를 위한 공인인증서 - Let's Encrypt 발급

2020-06-02: 매뉴얼 방식 수정

2020-02-02: 최초 작성
{:.right-history}

Nginx 서버에서 HTTPS 사용할 수 있는 공인인증서를 발급해 설치하려고 한다.

  • 여기서는 Lets Encrypt 무료 공인인증서 발급을 다룬다.
  • letsecrypt 공인인증서는 3개월 정도 기간만 사용 가능하고 갱신해야 한다.
  • **단독 도메인을 호스팅하는 개인 서버에서 Nginx**에 적용해 본다.

인증서는 개별 도메인 혹은 와일드카드 인증서 로 도메인 안의 모든 호스트를 포함하는 두 종류로 발급이 가능하다.

자세히 보기

openSUSE: firewalld

firewalld 를 이용해서 방화벽을 구성해 보자.

  • RedHat, Ubuntu, OpenSUSE LEAP 15.0 등은 시스템 기본 파이어월 관리자로 firewalld 를 제공한다고 한다.

firewalld

firewalld 는 ….

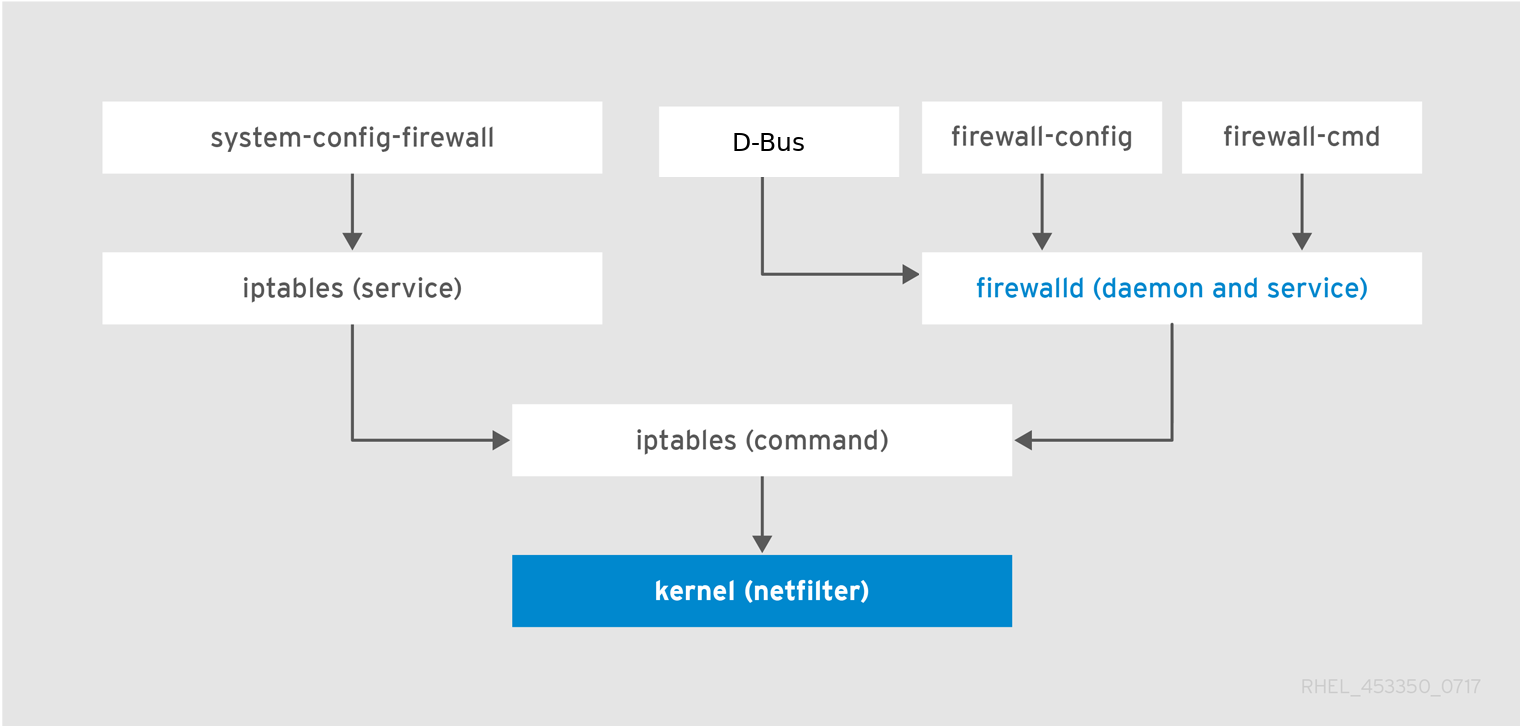
firewalld는 ufw 처럼 iptables 을 구성할 수 있다.

[그림. Firewall Stack (redhat.com)]

네트워크를 지역 관리가 가능해서 다른 네트워크, 지역에 따라 다른 규칙으로 구성해서 사용할 수 있다.
For example “Home” and “Office” where all communications with local machines are allowed, and “Public Wi-Fi” where no communication with the same subnet would be allowed.

https://www.ctrl.blog/entry/ufw-vs-firewalld

firewalld 설치

OpenSUSE LEAP 15.0, RedHat, Ubuntu 등은 시스템 기본 파이어월 관리자로 firewalld 를 제공한다고 한다.

1
$ sudo apt install firewalld

Start firewalld

To start firewalld, enter the following command as root:

1
systemctl start firewalld

root 사용자로 시작한다.

1
2
sudo systemctl enable firewalld
sudo reboot

For more information about the service status, use the systemctl status sub-command:

1
2
3
4
5
6
sudo systemctl status firewalld
● firewalld.service - firewalld - dynamic firewall daemon
Loaded: loaded (/usr/lib/systemd/system/firewalld.service; enabled; vendor preset: disabled)
Active: active (running) since Thu 1970-01-01 09:01:48 KST; 48 years 6 months ago

sudo firewall-cmd --state

Stop firewalld

To stop firewalld, enter the following command as root:

1
systemctl stop firewalld

To prevent firewalld from starting automatically at system start, enter the following command as root:

1
systemctl disable firewalld

To make sure firewalld is not started by accessing the firewalld D-Bus interface and also if other services require firewalld, enter the following command as root:

1
systemctl mask firewalld

사용해 보기

firewalld 는 명령라인 firewall-cmd 와 GUI로 firewall-config 명령을 지원한다.

Zone 설정

Get a list of all supported zones

1
firewall-cmd --get-zones

List all zones with the enabled features.

1
2
3
4
5
6
7
8
9
10
11
12
13
14
15
16
$ firewall-cmd --list-all-zones
...

public
target: default
icmp-block-inversion: no
interfaces:
sources:
services: ssh dhcpv6-client http https
ports:
protocols:
masquerade: no
forward-ports:
source-ports:
icmp-blocks:
rich rules:

기본으로 제공하는 Zone

  • drop: Any incoming network packets are dropped, there is no reply. Only outgoing network connections are possible.
  • block: Any incoming network connections are rejected with an icmp-host-prohibited message for IPv4 and icmp6-adm-prohibited for IPv6. Only network connections initiated within this system are possible.
  • public: For use in public areas. You do not trust the other computers on networks to not harm your computer. Only selected incoming connections are accepted.
  • external: For use on external networks with masquerading enabled especially for routers. You do not trust the other computers on networks to not harm your computer. Only selected incoming connections are accepted.
  • dmz: For computers in your demilitarized zone that are publicly-accessible with limited access to your internal network. Only selected incoming connections are accepted.
  • work
    For use in work areas. You mostly trust the other computers on networks to not harm your computer. Only selected incoming connections are accepted.
  • home
    For use in home areas. You mostly trust the other computers on networks to not harm your computer. Only selected incoming connections are accepted.
  • internal
    For use on internal networks. You mostly trust the other computers on the networks to not harm your computer. Only selected incoming connections are accepted.
  • trusted
    All network connections are accepted.

Zone

1
2
sudo firewall-cmd --get-default-zone
public

서비스

This command prints a space separated list.

Get a list of all supported services

1
$ firewall-cmd --get-services

This command prints a space separated list.

Get a list of all supported icmptypes

1
firewall-cmd --get-icmptypes

서비스를 제거하려면

1
2
3
4
# firewall-cmd --zone=public --remove-service=http
success
root@odroidc2:/home/qkboo# firewall-cmd --zone=public --remove-service=https
success

Http, Ssh 방화벽 활성화

http, https 를 공개 서비스를 지원하는 기본 존인 public에 추가한다.

1
2
3
sudo firewall-cmd --add-service=ssh
sudo firewall-cmd --add-service=http
sudo firewall-cmd --add-service=https

sudo firewall-cmd –zone=public –add-service=http –permanent

방화벽을 갱신한다

1
2
firewall-cmd --reload
firewall-cmd --state

혹은 zone을 지정해 추가한다.

1
2
3
4
sudo firewall-cmd --zone=web --add-service=ssh
sudo firewall-cmd --zone=web --add-service=http
sudo firewall-cmd --zone=web --add-service=https
sudo firewall-cmd --zone=web --list-all

Likewise, we can add the DNS service to our “privateDNS” zone:

1
2
sudo firewall-cmd --zone=privateDNS --add-service=dns
sudo firewall-cmd --zone=privateDNS --list-all

Zone 에 구성한 서비스 등은 런타임 혹은 완전히 방화벽에 구성할 수 있다.

To change settings in both modes, you can use two methods:
Change runtime settings and then make them permanent as follows:

1
2
firewall-cmd <other options>
firewall-cmd --runtime-to-permanent

Set permanent settings and reload the settings into runtime mode:

1
2
firewall-cmd --permanent <other options>
firewall-cmd --reload

모든 구성 내용 확인:

1
2
3
4
5
6
7
8
9
10
11
12
13
14
$ sudo firewall-cmd --list-all
public
target: default
icmp-block-inversion: no
interfaces:
sources:
services: ssh dhcpv6-client http https
ports:
protocols:
masquerade: no
forward-ports:
source-ports:
icmp-blocks:
rich rules:

특정 zone 에 대한 내역을 출력한다:

1
2
3
4
5
6
7
8
9
10
11
12
13
14
15
$ sudo firewall-cmd --zone=public --list-all
public
target: default
icmp-block-inversion: no
interfaces:
sources:
services: ssh dhcpv6-client http https
ports:
protocols:
masquerade: no
forward-ports:
source-ports:
icmp-blocks:
rich rules:

참조

https://www.linode.com/docs/security/firewalls/introduction-to-firewalld-on-centos/

FirewallD

Firewalld configuration and usage

Naver ncloud 설정

ncloud 서비스

sudoer 설정

새 사용자를 추가하고 suder 로 등록한 후에 사용한다. 우분투/데비안 계열 새 사용자 추가는 Odroid Install 문서를 참고한다.

새 사용자 등록

adduser 추가할 사용자에 대한 정보를 하나씩 묻고, 사용자 홈 디렉토리가 생성된다. 추가한 사용자에 대한 /etc/passwd, /etc/shadow, /etc/group and /etc/gshadow 편집이 된다

추가하고 패스워드를 입력한다.

1
2
# adduser USERNAME
# sudo passwd USERNAME

그리고 suder로 등록해 준다.

sudoer 등록

usermod 혹은 visudo 를 사용할 수 있다.

1
# usermod -aG sudo USERNAME

hostname 확인

hostname 명령에 따라 현재 호스트 이름이 /etc/hosts 혹은 dns resolver에서 검색되야 한다.

1
2
$ sudo systemcgl status nginx
sudo: unable to resolve host ubuntu-84

위 같은 경고가 나타난다면 호스트 이름을 /etc/hosts 에 등록해 준다.

ssh

서버에

1
$ ssh-keygen -t rsa -b 4096 -C "USER@localhost"

위 2 과정을 아래 명령 한 줄로 복사->붙여넣기를 동시에 할 수 있다.

클라이언트:

1
cat ~/.ssh/id_rsa.pub | ssh <USERNAME>@<IP-ADDRESS> 'cat >> .ssh/authorized_keys'

mongod-org 설치

커뮤티티에디션 설치

네이버 NCloud에서 Micro server를 하나 생성한 후에, MongoDB Community Edition을 설치했고, ncloud의 Ubuntu 16.01 이미지로 서버를 생성한 후에 업그레이드해서 16.04.4 LTS 버전에서 설치했다.

설정

mongodb 설정
mongodb auth

현재 실행중인 mongod 를 종료한다.

sudo systemctl stop mongod.service

MongoDB 설정
Mongo Database를 사용하기 위해서 데이터 파일 위치, 로그, 포트, Ip 주소 등에 대한 구성을 mongod.conf 에서 할 수 있다. 수정된 구성이 작동하는지 mongo 클라이언트로 접속해서 테스트한다.

mongod.conf

/etc/mongod.conf 파일에 인증을 제외한 데이터 디렉토리, bindIp, 로그 부분만 설정한다.

1
2
3
4
5
6
7
8
9
10
11
12
13
14
15
  dbPath: /data/mongodata/
journal:
enabled: true

systemLog:
destination: file
logAppend: true
path: /var/log/mongodb/mongod.log

processManagement:
fork: true

net:
port: 27017
bindIp: 0.0.0.0

설정을 저장하고 명령 라인에서 MongoDB를 다시 시작한 후에 mongo client로 접속한다.

모든 인터페이스에 db 접속을 허용하면 bindIpAll: true 를 사용한다.

1
$ sudo mongod --port 27017 --dbpath /var/lib/mongodb

이어서 클라이언트로 데이터베이스에 접속한다.접속에 성공하면 > 프롬프트가 나온다.

1
2
$mongo
>

admin 계정

mongod 에서 데이터베이스 및 사용자를 관리할 admin 이란 관리자를 추가하자

1
2
3
> use admin
switched to db admin
>

관자자의 권한과 역할을 선언한다.

1
2
3
4
5
6
7
8
>db.createUser(
{
user:'admin',
pwd:'****',
roles:['userAdminAnyDatabase']
}
)
Successfully added user: { "user" : "admin", "roles" : [ "userAdminAnyDatabase" ] }

사용자의 role 을 변경,

1
2
3
4
5
6
7
8
9
10
11
12
13
14
15
16
17
18
19
> db.grantRolesToUser( 'admin', [{role: 'userAdmin', db:'admin'}])
> db.getUsers()
[
{
"_id" : "admin.admin",
"user" : "admin",
"db" : "admin",
"roles" : [
{
"role" : "userAdmin",
"db" : "admin"
},
{
"role" : "userAdminAnyDatabase",
"db" : "admin"
}
]
}
]

관리자 admin 계정을 admin 데이터베이스에 추가한 후에 mongo client로 admin 계정으로 로그인해서 …

터미널에서 시작한 mongod 를 종료한다.

수동으로 mongod 를 시작하면 root 계정으로 데이터 파일이 생성된다. systemctl로 서비스 시작 전에 data 폴더 퍼미션을 맞춰준다.

Directory permissions
로그 디렉토리 /var/log/mongo 그리고 데이터 디렉토리 /data/mongodata 라면 해당 디렉토리에 몽고디비 사용자가 쓸 수 있는 퍼미션을 준다.

1
2
$ sudo chown mongo.daemon /var/log/mongodb
$ sudo chown mongodb.mongodb /data/mongodata

데이터베이스 사용자 추가

데이터베이스를 생성하고 해당 데이터베이스를 접속하는 사용자 계정을 추가하자.

수동으로 접근제어 –auth 옵션으로 데이터베이스를 시작하면, mongo 클리이언트 로그인시 -u , -p 와 –authenticationDatabase 를 지정해 주어야 한다.

1
$ mongo --port 27017 -u "admin" -p "****" --authenticationDatabase "admin"

The following operation creates accountUser in the products database and gives the user the readWrite and dbAdmin roles.

1
2
3
4
5
6
7
8
9
use products
db.createUser(
{
user: "accountUser",
pwd: "password",
roles: [ "readWrite", "dbAdmin" ]
}
)```

iptables Firewall on Ubuntu/Debian

일반적인 리눅스 배포본의 기본 방화벽인 iptables를 쉽게 사용할 수 있는 ufw 를 사용해서 리눅스에 방화벽을 구축하는 방법을 기술하고 있다.

iptables

iptables로 당연히 방화벽을 관리할 수 있다.

iptables -L 플래그

방화벽 룰, 액션에 대해 INPUT, OUTPUT, FORWARD 정보를 볼 수 있다.

1
$ sudo iptables -L

-S 플래그

우리 대신 사용 하 여 각 규칙 및 정책을 사용 하는 데 필요한 명령을 반영 하는 형식으로 출력을 볼 수 있는

1
$ sudo iptables -S

규칙을 모두 리플레시 할 수 있다

1
sudo iptables -F

방화벽

모든 규칙은 DENY -> 일부 허용 순서로 한다. 그래서 TCP 로 1번부터 65526번 포트까지 다 막는 방법이다. 만약 UDP도 막고싶다면,

1
sudo iptables -A INPUT -p tcp --dport 1:65526 -j DROP

ssh 22 자리는 포트

1
2
sudo iptables -I INPUT -p tcp --dport 22 -j ACCEPT
sudo iptables -I OUTPUT -p tcp --sport 22 -j ACCEPT

혹은 ip address 를 기반으로 설정할 수 있다.

1
2
iptables -I INPUT -p tcp --dport 22 -s 222.222.222.222 -j ACCEPT
iptables -I OUTUT -p tcp --dport 22 -d 222.222.222.222 -j ACCEPT

8080번으로 들어오는 포트를 80 번으로 바꾸기

1
2
3
sudo iptables -A INPUT -i eth0 -p tcp --dport 80 -j ACCEPT
sudo iptables -A INPUT -i eth0 -p tcp --dport 8080 -j ACCEPT
sudo iptables -A PREROUTING -t nat -i eth0 -p tcp --dport 80 -j REDIRECT --to-port 8080

iptables정보를 저장하고 재부팅 이후에도 동작하도록 설정함. <= vi 로 열어서 맨 마지막에 추가함.

1
2
3
sudo sh -c "iptables-save > /backup/iptables.rules"
sudo vi /etc/network/interfaces
pre-up iptables-restore < /etc/iptables.rules

Web

기본 httpd 사용을 위한 80번 포트 개방과, node.js, python 등 실습을 위한 8080번 포트를 열어 주기 위해서 /etc/sysconfig/iptables 에 아래와 같이 입력한다.

1
2
3
4
5
-A INPUT -p tcp -m tcp --dport 80 -j ACCEPT
-A OUTPUT -p tcp -m tcp --dport 80 -j ACCEPT
-A INPUT -p tcp -m tcp --dport 8080 -j ACCEPT
-A OUTPUT -p tcp -m tcp --dport 8080 -j ACCEPT
-A INPUT -j REJECT --reject-with icmp-host-prohibited

iptables 규칙을 만들 때는 순서가 매우 중요하다.
이 때 주의해야 할 것은 위의 4개 코드가 빨간 색의 코드보다 반드시 위에 적혀 있어야 한다.

예를 들어 만일 chain에서 로컬 192.168.100.0/24 서브넷에서 들어오는 모든 패킷을 drop하도록 지정한 후 (drop 하도록 지정된 서브넷에 포함되는) 192.168.100.13에서 들어오는 패킷을 모드 허용하는 chain (-A)을 그 후에 추가하면 뒤에 추가된 추가 규칙이 무시된다.
먼저 192.168.100.13를 허용하는 규칙을 설정한 후 서브넷을 drop하는 규칙을 설정해야한다.

이후에

service iptables restart

명령어를 실행해주면 2개의 포트가 열러서 정상적으로 외부접속이 가능해지는 것을 확인할 수 있다.

로그에 있는 IP 목록을 출력

1
egrep -o '[0-9]+\.[0-9]+\.[0-9]+\.[0-9]+' | sort -u

Check blocked ip addresses

iptables 명령으로 막혀있는 ip address를 출력해 보자. [^3]

1
$ sudo iptables -L -n --line
1
2
$ sudo iptables -L INPUT -v -n
08:43:89:08:00:45:00:00:3c:97:2b:40:00:34:06:4d:8b SRC=90.202.157.25 DST=220.121.141.168 LEN=60 TOS=0x│Chain INPUT (policy DROP 48 packets, 2312 bytes

참조

[^3]: Check blocked IP in iptables

Monitoring fail2ban

Monitoring fail2ban

Install

로그를 검사해 의심스런 IP 를 찾아 Firewall rule을 관리하기 어렵다 Fail2ban은 정규표현식을 사용해서 로그에서 의심스런 IP를 찾아 Firewall 등록할 수 있도록 해준다.

Fail2ban

로그를 검사해 의심스런 IP 를 찾아 Firewall rule에 등록해 관리하는 것은 어려운 과정이다. Fail2ban은 정규표현식을 사용해서 로그에서 의심스런 IP를 찾아 Firewall 등록 할 수 있도록 해준다.

설치

fail2baniptables 패키지와 함께 설치한다.

1
$ sudo apt install iptables fail2ban

그리고 systemctl 로 재대로 서비스가 시작되는지 확인해 본다.

1
2
$ sudo systemctl restart fail2ban.service    # 재시작
$ sudo systemctl status fail2ban.service # running 상태 확인

설정을 위해서 fail2ban 설정 파일인 fail2ban.conf, 그리고 jail 파일 jail.conf 파일을 .local 파일로 복사한 사용자 정의 파일에서 사용한다.

1
2
3
$ cd /etc/fail2ban
$ sudo cp fail2ban.conf fail2ban.local # 설정파일
$ sudo cp jail.conf jail.local # jail 설정

/etc/fail2ban 디렉토리

설치된 후 관련된 설정 파일은 /etc/fail2ban 디렉토리에 저장됩니다. 관련한 로그 기록은 /etc/logratate.d/fail2ban에 정의되어 /var/log/fail2ban.log 로 저장됩니다.

다음은 설정 디렉토리 구조

1
2
3
4
5
6
7
8
9
10
11
12
13
14
15
16
17
18
19
$ tree -L 2 fail2ban/
fail2ban/
├── action.d
│   ├── ...
│   ├── ufw.conf
│   └── xarf-login-attack.conf
├── fail2ban.conf
├── fail2ban.local
├── fail2ban.d
├── filter.d
│   ├── ...
│   ├── sshd.conf
│   └── xinetd-fail.conf
├── jail.conf
├── jail.d
│   └── defaults-debian.conf
├── jail.local
├── paths-common.conf
└── paths-debian.conf
  • jail.conf: jail 이라 불리는 모니터링할 대상에 대한 기본 옵션과 행위를 선언한다.
  • action.d/iptables-multiport.conf: fila2ban 이 jail에 맞게 거부(Ban)한 IP를 다루는 기본 액션이다.
  • fail2ban.local : fail2ban 주요 설정 파일
  • jail.local: jail 설정 파일
  • jaild.d/defaults-debian.conf: jail enable/disable
  • paths-common.conf: 로그 파일 경로
  • paths-debian.conf: 로그 파일 경로

설정

fail2ban은 jail 을 구성하고 jail의 filter 그리고 action으로 나뉘어 있다.

fail2ban.conf 구성

fail2ban.conf는 기본 구성 변수로 loggin, socket 그리고 PID 파일 등등이 설정된다. 별도의 파일로 Jail을 구성할 때 fail2ban.local 같은 이름을 사용하고 새로 설정되는 값은 기본 설정 값을 재정의 하게 된다.

단 같은 [default] 섹션이 존재하면 구성된 내용 적용이 잘 안된다.

다음 스크립을 사용하면 모둔 변수를 주석 처리하고 수정할 옵션만 복사해 준다.

1
sed 's/\(^[[:alpha:]]\)/# \1/' fail2ban.conf | sudo tee fail2ban.local 1&> /dev/null

fail2ban.local 파일은 다음과 같은 내용을 담을 것이다.

  • loglevel: The level of detail that Fail2ban’s logs provide can be set to 1 (error), 2 (warn), 3 (info), or 4 (debug).
  • logtarget: Logs actions into a specific file. The default value of /var/log/fail2ban.log puts all logging into the defined file. Alternately, you can change the value to STDOUT, which will output any data; STDERR, which will output any errors; SYSLOG, which is message-based logging; and FILE, which outputs to a file.
  • socket: The location of the socket file.
  • pidfile: The location of the PID file.

jail.conf

/etc/fail2ban/jail.conf 는 데몬, 서비스에 대한 jail을 구성한다. jail은 log를 읽어 불필요한 것을 찾아 낸다.
다음은 jail.conf에서 주석이 달린 jail.local을 생성해 준다.

1
sed 's/\(^[[:alpha:]]\)/# \1/' jail.conf | sudo tee jail.local 1&> /dev/null

If using CentOS or Fedora open jail.local and set the backend to systemd. This is not necessary on Debian 8, even though it is a SystemD system.

/etc/fail2ban/jail.local

1
backend = systemd

화이트리스트 IP

먼저 검출된 IP 중에 무시할 영역, 화이트리스트를 선언해 줍니다. 리스트는 ‘,’로 구분하고 서브넷 혹은 IP주소를 입력한다.

1
2
[DEFAULT]
ignoreip = 127.0.0.1/8 192.168.0.1/24

차단 시간과 재시도 횟수

bantime, findtime, maxretry 은 차단 시간에 대한 구성이다.

1
2
3
bantime = 2592000
findtime = 600
maxretry = 3
  • bantime: 검출된 IP가 접속 차단 시간을 초단위로 선언해 준다. -1 이면 영속적으로 밴 된다.
  • findtime: ban이 설정 전에 로그인 간격 시간
  • maxretry: 최대 횟수

https://arno0x0x.wordpress.com/2015/12/30/fail2ban-permanent-persistent-bans/

로컬 시스템의 이메일 주소를 sendmail -t user@email.com, replacing user@email.com with your email address.

이메일

fail2ban에 검출되는 jail이 있으면 이메일 설정에 따라 메일로 경고를 받을 수 있다.

  • destemail: The email address where you would like to receive the emails.
  • sendername: The name under which the email shows up.
  • sender: The email address from which Fail2ban will send emails.

그리고 action 설정을 조절할 필요가 있다, 이것은 ban 상황이 기준점에 닿으면 발생한다. 기본 액션 %(action_)s은 사용자만 ban 한다. action_mw 액션은 ban을 실행하고 WhoIS 리포트로 메일을 보내준다. action_mwl은 모든 로그까지 함께 보내준다.

You will also need to adjudst the action setting, which defines what actions occur when the threshold for ban is met. The default, %(action_)s, only bans the user. action_mw will ban and send an email with a WhoIs report; while action_mwl will ban and send an email with the WhoIs report and all relevant lines in the log file. This can also be changed on a jail-specific basis.

1
action = %(action_)s
1
$ sudo service fail2ban restart

각 서버스에 대한 Jail 설정

필터를 이용해 Jail을 만들어 의심스런 접근을 막아 보자. 앞서 복사한 jail.local 파일에는 주요 서비스가 모두 선언되어 있고 sshd 만 활성화 되어 있다.

Jail은 다음 같이 구성된다.

1
2
3
4
5
6
7
8
[ssh]

enabled = true
port = ssh
filter = sshd
logpath = /var/log/auth.log
maxretry = 6

  • enabled: Determines whether or not the filter is turned on.
  • port: The port Fail2ban should be referencing in regards to the service. If using the default port, then the service name can be placed here. If using a non-traditional port, this should be the port number. For example, if you moved your SSH port to 3456, you would replace ssh with 3456.
  • filter: The name of the file located in /etc/fail2ban/filter.d that contains the failregex information used to parse log files appropriately. The .conf suffix need not be included.
  • logpath: Gives the location of the service’s logs.
  • maxretry: Will override the global maxretry for the defined service. findtime and bantime can also be added.
    action: This can be added as an additional setting, if the default action is not suitable for the jail. Additional actions can be found in the action.d folder.

각 서비스에 대한 jail은 jail.d에 설정 파일을 구성해도 된다.

(1) sshd

Brute-force Attack과 같은 접근을 차단하는 필터로 로그에 아래와 유사한 패턴이 나오면 IP를 검출한다.

Jul 22 06:56:50 foo sshd[14984]: Failed password for invalid user a from xxx.xxx.xxx.xxx port 55452 ssh2

jail.config 혹은 jail.local 에서 기본으로 활성화 되어 있다.

(2) ssh-ddos

sshd-ddos Filter를 사용해 SSH Service를 Scanning하거나 telnet으로 접속할 떄 발생하는 Message를 검사하여 해당 IP의 접근을 차단할 수 있습니다.

이 Filter로 검출되는 /var/log/auth.log의 Message는 다음과 같습니다.

Jul 23 13:16:25 foo sshd[21989]: Did not receive identification string from xxx.xxx.xxx.xxx

Jail 설정을 위해서 다음과 같이 입력합니다.

1
2
[sshd-ddos]
enabled = true

혹은 $ sudo vi /etc/fail2ban/jail.d/sshd-ddos.conf

1
$ sudo service fail2ban restart

Failregrexs

다양한 필터를 사용할 수있다. 의심스런 동작을 Filter로 선언해서 사용하는데 해당 필터를 점검해야할 필요가 있다. 다음

1
$ sudo fail2ban-regex /var/log/auth.log /etc/fail2ban/filter.d/sshd.conf

이 필터를 사용자가 작성할 수 있는데 파이썬의 정규식을 사용해서 사용자 지정 필터를 작성한다.

access.log 필터 작성해 보기

nginx 로그를 대상으로 200 에러를 검출해 보자

1
91.134.232.57 - - [28/Nov/2016:07:30:23 +0900] "GET / HTTP/1.1" 200 1125 "http://hundej

123.143.201.75 - - [28/Nov/2016:17:29:18 +0900] “HEAD / HTTP/1.1” 200 0 “-“ “python-requests/2.10.0”

fail2ban-regex /var/log/nginx/access.log /etc/fail2ban/filter.d/nginx-test.conf

Ban 관리

fail2ban-client set YOURJAILNAMEHERE unbanip IPADDRESSHERE

Use iptables -L -n to find the rule name…
…then use fail2ban-client status to get the actual jail names.

룰 이름이 표시된다 f2b- 으로 시작하는 룰을 찾는다

그리고 fail2ban-status 는

fail2ban-client set YOURJAILNAMEHERE unbanip IPADDRESSHERE

HOW to fail2ban

basic usages

1
2
sudo fail2ban-regex /var/log/auth.log /etc/fail2ban/filter.d/sshd.conf

1
sudo iptables -L --line-numbers

Nginx

기본으로 /etc/fail2ban/jail.conf 에 [nginx-http-auth] jail이 하나 선언되어 있다.

[nginx-http-auth]

enabled = true
filter = nginx-http-auth
port = http,https
logpath = /var/log/nginx/error.log

nginx jail

nginx-noscript

웹 사이트에서 실행되고 침투할 수 있는 코드를 찾아 준다. php 등이 웹 사이트와 연동되지 않았다면 아래 제일을 추가해서 이런 임의의 실행코드 형식 실행을 방지할 수 있다

1
2
3
4
5
6
7
8
[nginx-noscript]

enabled = true
port = http,https
filter = nginx-noscript
logpath = /var/log/nginx/access.log
maxretry = 6

nginx-badbots

웹 요청에 악의적인 봇을 호출하는 것을 방지한다.

1
2
3
4
5
6
7
[nginx-badbots]

enabled = true
port = http,https
filter = nginx-badbots
logpath = /var/log/nginx/access.log
maxretry = 2

filter

추가한 jail 이 동작할 필터를 작업해 주어야 한다. 필터는 /etc/fail2ban/filter.d 디렉토리에 있다.

nginx-http-auth.conf

기본으로 제공하는 nginx-http-auth.conf 필터에 하나를 더 추가해 준다. 아래는 사용자가 아이디와 비밀번호를 입력하지 않는 경우에 대해 필터한다. 아래의 no user/password 패턴을 추가한다.

1
2
3
4
5
6
7
[Definition]


failregex = ^ \[error\] \d+#\d+: \*\d+ user "\S+":? (password mismatch|was not found in ".*"), client: <HOST>, server: \S+, request: "\S+ \S+ HTTP/\d+\.\d+", host: "\S+"\s*$
^ \[error\] \d+#\d+: \*\d+ no user/password was provided for basic authentication, client: <HOST>, server: \S+, request: "\S+ \S+ HTTP/\d+\.\d+", host: "\S+"\s*$

ignoreregex =

nginx-badbots.conf

1
sudo cp apache-badbots.conf nginx-badbots.conf

nginx-noscript

[nginx-noscript] jail 은 다음 내용을 입력한다:

1
2
3
4
5
[Definition]

failregex = ^<HOST> -.*GET.*(\.php|\.asp|\.exe|\.pl|\.cgi|\.scgi)

ignoreregex =

nginx-nohome

1
2
3
4
5
[Definition]

failregex = ^<HOST> -.*GET .*/~.*

ignoreregex =

nginx-noproxy

1
2
3
4
5
[Definition]

failregex = ^<HOST> -.*GET http.*

ignoreregex =

Jail 실행 확인

1
2
3
4
$ sudo fail2ban-client status
Status
|- Number of jail: 6
`- Jail list: nginx-noproxy, nginx-noscript, nginx-nohome, nginx-badbots, ssh-ddos, ssh

그리고 iptable의 서비스로 방화벽 규칙에 fail2ban 규칙이 동작중인지 확인한다.

1
2
3
4
5
6
7
8
9
10
11
12
 $ sudo iptables -S
...

-A fail2ban-nginx-badbots -j RETURN
-A fail2ban-nginx-nohome -j RETURN
-A fail2ban-nginx-noproxy -j RETURN
-A fail2ban-nginx-noscript -j RETURN
-A fail2ban-ssh -j RETURN
-A fail2ban-ssh-ddos -j RETURN

...

그리고 fail2ban 의 jail 실행 상태를 자세히 보고 싶므면 status 뒤에 jail 이름을 주면 된다.

1
2
3
4
5
6
7
8
9
10
$ sudo fail2ban-client status nginx-badbots
Status for the jail: nginx-badbots
|- filter
| |- File list: /var/log/nginx/access.log
| |- Currently failed: 0
| `- Total failed: 0
`- action
|- Currently banned: 0
| `- IP list:
`- Total banned: 0

Testing

의심스런 동작을 Filter로 선언해서 사용하는데 해당 필터를 점검해야할 필요가 있다. 다음

1
$ sudo fail2ban-regex /var/log/auth.log /etc/fail2ban/filter.d/sshd.conf

Ban 관리

nginx 인증 요구시 잘못된 인증을 시도하면 fail2ban 규칙에 따라 접근이 금지당한다. 그리고 jail 규칙이 잘 적용 됐는지 결과를 다음 같이 확인할 수 있다:

1
2
3
4
5
6
7
8
9
10
11
$ sudo fail2ban-client status nginx-http-auth
Output
Status for the jail: nginx-http-auth
|- filter
| |- File list: /var/log/nginx/error.log
| |- Currently failed: 0
| \- Total failed: 12
\- action
|- Currently banned: 1
| \- IP list: 111.111.111.111
\- Total banned: 1

인증 규칙에 어긋나는 접근을 시도한 IP인 111.111.111.111을 확인 할 수 잇다.
금지된 IP는 해당 jail을 이용해 다음 같이 해제할 수 있다.

1
$ sudo fail2ban-client set nginx-http-auth unbanip 111.111.111.111

nginx-req-limit

http://blog.ricardomacas.com/index.php?controller=post&action=view&id_post=3

fail2squared

https://supine.com/posts/2012/08/fail2ban-monitoring-itself-recursively/

TO COMPLETELY FLUSH THE FAIL2BAN LOG FILE AND CLEAR OUR BLACKLIST FILE

sudo service fail2ban stop
sudo truncate -s 0 /var/log/fail2ban.log
sudo truncate -s 0 /etc/fail2ban/ip.blacklist
sudo rm /var/lib/fail2ban/fail2ban.sqlite3
sudo service fail2ban restart

https://ubuntu101.co.za/security/fail2ban/fail2ban-persistent-bans-ubuntu/

sqlite3

fail2ban.conf file, I found the following:

1
dbfile = /var/lib/fail2ban/fail2ban.sqlite3

So, I did a little research to try to find out how access the database.

To open or connect to the database:

1
$ sqlite3 /var/lib/fail2ban/fail2ban.sqlite3

To list all the tables in the database:

1
2
sqlite> .tables
bans fail2banDb jails logs

To query a table:

1
sqlite> SELECT * FROM logs;

Another table:

sqlite> SELECT * FROM bans;

To disconnect from the database:

sqlite> .quit

참조

참조: https://www.digitalocean.com/community/tutorials/how-to-protect-ssh-with-fail2ban-on-debian-7

fail2ban log

fail2ban log

fail2ban 로그는 아래 형태로

1
2
3
4
5
6
7
8
9
2016-08-28 12:35:56,163 fail2ban.actions[860]: WARNING [ssh] Ban 103.237.147.19
2016-08-28 12:36:09,215 fail2ban.actions[860]: WARNING [ssh] Ban 115.248.186.3
2016-08-28 17:39:47,806 fail2ban.actions[860]: WARNING [ssh] Ban 117.3.120.94
2016-08-28 23:06:21,291 fail2ban.actions[860]: WARNING [ssh] Ban 155.94.163.64
2016-08-29 19:50:51,400 fail2ban.actions[860]: WARNING [ssh] Ban 182.75.249.110
2016-08-31 14:26:54,093 fail2ban.actions[860]: WARNING [ssh] Ban 103.207.36.36
2016-09-01 02:23:23,790 fail2ban.actions[860]: WARNING [ssh] Ban 45.32.60.93
2016-09-01 17:44:35,854 fail2ban.filter [860]: WARNING Determined IP using DNS Lookup: 61-216-182-218.hinet-ip.hinet.net = ['61.216.182.218']
2016-09-01 17:47:18,004 fail2ban.actions[860]: WARNING [ssh] Ban 61.216.182.218

awk 이용 ip 주소 추출

awk 를 사용해서 로그에서 ip주소를 추출해 보자. 로그 내용에서 ‘Ban’을 포함한 줄을 만나면 $NF 변수에 각 컨럼을 저장한다.

1
2
3
4
5
$sudo awk '($(NF-1) = /Ban/){print $NF}' /var/log/fail2ban.log
103.237.147.19
115.248.186.3
117.3.120.94

IP주소를 정렬

1
2
3
4
$sudo awk '($(NF-1) = /Ban/){print $NF}' /var/log/fail2ban.log | sort | uniq -c | sort -n
1 103.207.36.36
1 103.237.147.19
1 115.248.186.3
  • 각 거부당한 IP 주소는 최대 실패 횟수 이후 ban 하므로 30회 이상의 시도가 있을

모든 백업 로그에서 IP 주소 추출

백업된 로그 파일을 모두 사용하려면 zgrep 명령을 사용해도 좋다

1
$sudo zgrep -h "Ban " /var/log/fail2ban.log* | awk '{print $NF}' | sort | uniq -c | sort -n

다음은 아주 위험한 서브넷을 출력한다.

1
2
3
4
5
6
7
8
9
10
11
$sudo zgrep -h "Ban " /var/log/fail2ban.log* | awk '{print $NF}' | awk -F\. '{print $1"."$2"."}' | sort | uniq -c  | sort -n | tail
2 222.186.
3 111.74.
3 116.100.
3 182.100.
3 195.154.
3 42.117.
7 115.239.
8 91.224.
14 103.207.
39 221.229.
1
2
3
4
5
6
$sudo zgrep -c 221.229 /var/log/fail2ban.log*
/var/log/fail2ban.log:0
/var/log/fail2ban.log.1:2
/var/log/fail2ban.log.2.gz:0
/var/log/fail2ban.log.3.gz:2
/var/log/fail2ban.log.4.gz:68

전체 로그에 순위 매기기

1
2
3
4
5
zcat /var/log/auth.log* | grep 'Failed password' | grep sshd | awk '{print $1,$2}' | sort -k 1,1M -k 2n | uniq -c

161 Mar 20
202 Mar 21

참조
Multiple log file

http://serverfault.com/questions/486301/how-to-set-up-fail2ban-to-read-multi-log-in-a-jail