이전 글 Hexo: icarus 테마 git기반 설치와 업그레이드 에 변경과 configurationsfile 을 더한 내용이다.
static file 기반 블로엔진인 Hexo에서 테마로 icarus 를 사용하려고 한다. 여기서는 icarus theme를 git으로 설치한다. 그리고 최신 버전으로 업그레이드 하는 과정을 살펴본다. 또한 icarus theme의 구성 파일에 대해서 좀 더 세부적으로 살펴본다.
- Icarus theme git 설치
- Configuration files
- Upgrade
1. Icarus theme git 설치
icarus 테마는 getting-started-with-icarus 에 설명이 되어 있다. 여기서는 git 을 클론해서 사용해 보도록 하겠다.
- git clone
icarus 릴리즈 페이지 https://github.com/ppoffice/hexo-theme-icarus/releases 를 확인해서 원하는 버전 번호를 찾는다. hexo 프로젝트 폴더에 들어가서 아래 같이 5.0.0 버전을 지정해서 클론을 수행한다.
1 | $ cd PROJECT_FOLDER |
클론한 결과는 아래 같은 폴더 구조를 갖는다.
1 | themes/icarus |
- 설정
이제 hexo의 구성 파일 _config.yml 에 테마를 icarus 로 지정한다.
1 | #_config.yml |
그리고 icarus 구성 파일 _config.icarus.yml 에 먼저 버전을 명시하고 icarus 테마 관련 설정을 진행한다.
1 | version: 5.0.0 |
Configuration files
Icarus theme의 구성파일은, jyekyll 의 구성요소 + icarus 구성 파일로 제공한다. 구성 파일을 통해서 여러 형식의 화면 표현을 가능하게 한다. _config.yml 와 같은 위치에 있으면 된다.
아래는 구성파일의 우선순위 순서로 작성되어 있다:
_config.yml: 사이트 구성 파일 (jekyll 의 기본 구성파일)- hexo _config.yml
_config.icarus.yml: Icarus theme 기본 구성파일.- 레이아웃 구성 파일
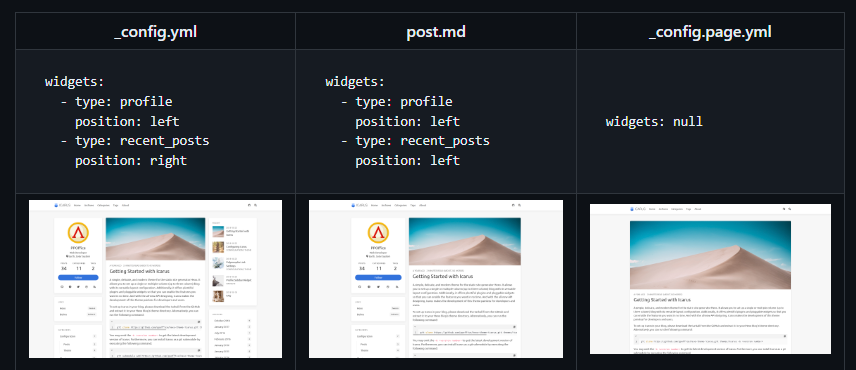
_config.post.yml: 글 내용 POST 레이아웃 화면/위젯 구성_config.page.yml: 페이지의 레이아웃 화면/위젯 구성
- Jykell 의 Post/page front-matter
- (Deprecated) Legacy theme configuration file at themes/icarus/_config.yml
- (Deprecated) Legacy layout configuration file at themes/icarus/_config.post.yml and themes/icarus/_config.page.yml
Layout Configuration Files
레이아웃 구성은 icarus theme 의 구성파일과 같은 구조를 갖는다. 모든 블로그 포스트의 레이아웃을 위해서 _config.post.yml 파일을 참조한다. 그리고 _config.page.yml 은 사용자 지정 페이지를 위한 레이아웃에 적용된다.
_config.icarus.yml 파일:
- 세 개의 컬럼으로 사이트의 레이아웃을 배치한다.
1
2
3
4
5
6
7
8
9
10widgets:
-
type: recent_posts
position: left
-
type: categories
position: right
-
type: tags
position: right
_config.post.yml 파일
- POST는 위젯 위치를 left 로 두어서 위젯+본문의 두개 컬럼으로 구성된다.
1 | widgets: |
Post/Page Front-matter
어떤 페이지/포스트에서 사이트/레이아웃 구성을 오버라이드 하려면 해당 포스트(글) 혹은 페이지의 Front-matter 로 구성해 사용하면 된다.
작성한 포스트 source/_post/some-post.md 에 선언한 Front-matter 구성.
1 | title: My first post |
some-post.md 의 Front-matter 는 아래 사항을 오버라이드한다.
_config.post.yml,_config.icarus.yml의 article.highlight 를 atom-one-dark 로 재구성한다.- 단, font-matter에서 title, date, updated, comments, layout, source, photos, and excerpt 등은 재정의 되지 않는다.
Site Configuration File
앞서 설명한 icarus 테마, 레이아웃, font matter 파일을 사이트 구성파일을 재정의 한 것이다.
3. Upgrade
다른 버전의 icarus theme 로 업그레이드를 하려면 기존 폴더를 백업해 두고 다시 git clone을 통해 다운로드하고 _config.icarus.yml 구성 파일에 버전과 내용을 변경해서 사용하면 된다.
예를 들어 앞서 5.0.0 버전을 백업하고 5.1.1 버전으로 업그레이드 한다면 아래 같이 기존 irarus 를 icarus_5.0.0 같이 백업해 두고 새 버전이 잘 적응되는지 확인후 정리하면 된다.
1 | $ cd PROJECT_FOLDER/theme |
이어서 새 버전을 git clone 한다.
1 | $ git clone https://github.com/ppoffice/hexo-theme-icarus.git themes/icarus -b 5.1.1 --depth 1 |
hexo의 구성 파일 _config.icarus.yml 에 새 icarus 테마 버전을 명시한다.
1 | version: 5.1.1 |
hexo 서버를 재시작해 정상적으로 동작하는지 확인한다. 그런데 필요한 npm 모듈 업그레이들 요구한다.
1 | $ hexo server |
요구에 따라 업그레이드 해주면 된다.
1 | $ npm install --save hexo-component-inferno@^2.0.2 |
정상적으로 업그레이드 되어서 server가 실행되는 것을 확인할 수 있다. 단, hexo clean 이후 에러를 만날 수 있어 보인다.
업그레이드 후 db.json 에러 대응
clean 해서 새로 생성하기 위해서 clean 명령후 generate 를 2번 정도 실행하면 보통는 db.json 에러가 없어지는데 업그레이드 후 아래 같이 계속 발생한다.
1 | INFO === Registering Hexo extensions === |
블로그 solved-hexo-include-markdown 를 따라 다음 같이 처리했다.
1 | # |
Upgrade to Icarus 5.2.1
2023/7월 Icarus 5.2.1 로 업그레이드 진행
1 | git clone https://github.com/ppoffice/hexo-theme-icarus.git icarus -b 5.2.1 |
_config.icarus.yml 에 icarus theme 버전을 명시한다.
1 | version: 5.2.1 |
서버를 재시작하고 확인한다. npm 모듈등… 문제가 없이 잘 진행된다.


 {: width=”500”}
 {:width=”400”}