WSL2 잘 사용하기

WSL2 이용 Linux 사용시 쓸만한 팁

  1. wsl 사용 명령
  2. WSL 쉘 사용
  3. wsl 하위 시스템 디렉토리
  4. wsl 구성 파일
  5. wsl 외부 디스크 마운트 하기
  6. wsl 배포본 이름 변경하기

1. wsl 사용 명령

윈도우즈 하위 시스템 목록

1
2
3
4
5
# Linux용 Windows 하위 시스템의 목록
PS> wsl -l

# Linux용 Windows 하위 시스템의 상태를 표시
PS> wsl --status

wsl 재시작

혹은 윈도우 서비스를 재시작할 수 있다. Windows에서 PowerShell을 관리자 권한으로 열고 다음 명령을 실행하면 됩니다.

1
PS> Restart-Service LxssManager

wsl 종료

하위 시스템 배포본을 지정해 종료하려면 -t <Distro> 명령을 사용한다.

1
2
3
4
PS> wsl -l
Ubuntu-20.04(기본값)

PS> wsl -t Ubuntu-20.04

wsl shutdown

모든 하위 시스템을 종료 시키려면 --shutdown 명령을 사용한다. --shutdown 명령은 실행 중인 모든 배포과 WSL 2 경량 유틸리티 가상 머신을 즉시 종료한다.

1
PS> wsl --shutdown

Unregister

Window store 에서 설치한 배포본을 삭제해도 wsl 의 Distro 목록에는 남아 있다. 이것은 --unregistre 명령으로 제거할 수 있다.

1
2
3
4
PS> wsl -l --all
Linux용 Windows 하위 시스템 배포:
Ubuntu-20.04(기본값)
Ubuntu-22.04

--unregistre 명령으로 제거한 Distro 등록을 해제한다.

1
2
3
4
5
6
7
PS> wsl --unregister Ubuntu-22.04
등록 취소 중입니다.
작업을 완료했습니다.

PS> wsl -l
Linux용 Windows 하위 시스템 배포:
Ubuntu-20.04(기본값)

2. WSL 쉘 사용

--system : 현재 시스템의 distro의 셸을 시작한다.

1
2
3
4
5
PS> wsl --system
wslg [ /mnt/c/Users/daddy ]$ cd
wslg [ ~ ]$
wslg [ ~ ]$ exit
logout

--exec, -e: 시스템 distro의 명령을 현재 PowerShell에서 실행한다.

1
2
3
PS> wsl -e bash
()qkboo:/mnt/c/Users/daddy$ cd
()qkboo:~$

2. WSL 하위 시스템 디렉토리

윈도우즈와 하위 시스템의 디렉토리를 Host 의 프로그램 들에서 사용할 수 있다.

탐색기에서 직접 접근하기

윈도우즈에서 네트워크 경로로 WSL 하위 시스템 디렉토리를 접근할 수 있다.

1
\\wsl$\<Distribution>:

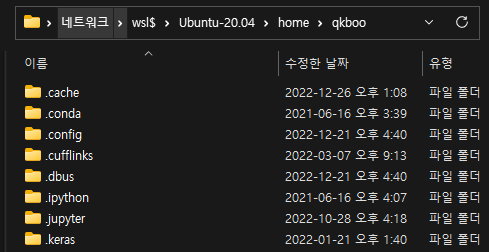
예를 들어 하위 시스템 이름이 Ubuntu-20.04 이고 계정이 qkboo 이라면 탐색기에서 qkboo 계정의 홈디렉토리를 이렇게 접그할 수 있다.

1
\\wsl$\Ubuntu-20.04\home\qkboo

아래는 윈도우즈 탐색기에서 wsl 홈디렉토리를 접근한 캡쳐 화면인다.

터미널에서 홈디렉토리 탐색기 열기

터미널에서 윈도우즈 탐색기를 직접 열 수 있다.

1
$ explorer.exe .

VisualStudio Code 에서 현재 디렉토리를 연다.

1
$ code.exe .

3. WSL 고급 설정 구성

배포본 구성 파일 wsl.conf 와 전역 구성 파일 .wslconfig 이 있다.

전역 구성 파일 .wslconfig

wslconfig 예제 파일

1
2
3
4
5
6
7
8
9
10
11
12
13
14
15
16
17
18
19
20
21
22
23
24
25
26
27
28
29
30
31
32
# Settings apply across all Linux distros running on WSL 2
[wsl2]

# Limits VM memory to use no more than 4 GB, this can be set as whole numbers using GB or MB
memory=4GB

# Sets the VM to use two virtual processors
processors=2

# Specify a custom Linux kernel to use with your installed distros. The default kernel used can be found at https://github.com/microsoft/WSL2-Linux-Kernel
kernel=C:\\temp\\myCustomKernel

# Sets additional kernel parameters, in this case enabling older Linux base images such as Centos 6
kernelCommandLine = vsyscall=emulate

# Sets amount of swap storage space to 8GB, default is 25% of available RAM
swap=8GB

# Sets swapfile path location, default is %USERPROFILE%\AppData\Local\Temp\swap.vhdx
swapfile=C:\\temp\\wsl-swap.vhdx

# Disable page reporting so WSL retains all allocated memory claimed from Windows and releases none back when free
pageReporting=false

# Turn off default connection to bind WSL 2 localhost to Windows localhost
localhostforwarding=true

# Disables nested virtualization
nestedVirtualization=false

# Turns on output console showing contents of dmesg when opening a WSL 2 distro for debugging
debugConsole=true

배포본 구성 파일 wsl.conf

  • 위치: /etc/wsl.conf
  • wsl1, wsl2 배포본에 대한 구성을 지정한다.
  • 단, Windows 빌드 17093 이상에서만 사용할 수 있다.
  • systemd 지원
  • automount 지원
    DrvFS 지원
    interop 설정 등등
  • wsl.conf 구성 설정

wsl.conf 예제

1
2
3
4
5
6
7
8
9
10
11
12
13
14
15
16
17
18
19
20
21
22
23
24
25
26
27
28
29
30
31
32
33
# Automatically mount Windows drive when the distribution is launched
[automount]

# Set to true will automount fixed drives (C:/ or D:/) with DrvFs under the root directory set above. Set to false means drives won't be mounted automatically, but need to be mounted manually or with fstab.
enabled = true

# Sets the directory where fixed drives will be automatically mounted. This example changes the mount location, so your C-drive would be /c, rather than the default /mnt/c.
root = /

# DrvFs-specific options can be specified.
options = "metadata,uid=1003,gid=1003,umask=077,fmask=11,case=off"

# Sets the `/etc/fstab` file to be processed when a WSL distribution is launched.
mountFsTab = true

# Network host settings that enable the DNS server used by WSL 2. This example changes the hostname, sets generateHosts to false, preventing WSL from the default behavior of auto-generating /etc/hosts, and sets generateResolvConf to false, preventing WSL from auto-generating /etc/resolv.conf, so that you can create your own (ie. nameserver 1.1.1.1).
[network]
hostname = DemoHost
generateHosts = false
generateResolvConf = false

# Set whether WSL supports interop process like launching Windows apps and adding path variables. Setting these to false will block the launch of Windows processes and block adding $PATH environment variables.
[interop]
enabled = false
appendWindowsPath = false

# Set the user when launching a distribution with WSL.
[user]
default = DemoUser

# Set a command to run when a new WSL instance launches. This example starts the Docker container service.
[boot]
command = service docker start

4. wsl 외부 디스크 마운트 하기

윈도우즈 wsl 에서 리눅스 파티션 혹은 USB 파티션 디스크를 마운트해서 사용하려고 한다.

  1. 관리자 모드에서 Powershell 을 연다.

파워쉘에서 연결된 디스크 목록을 확인한다.

1
2
3
4
5
6
7
PS> GET-CimInstance -query "SELECT * from Win32_DiskDrive"

DeviceID Caption Partitions Size Model
-------- ------- ---------- ---- -----
\\.\PHYSICALDRIVE0 ST2000DM008-2FR102 1 2000396321280 ST2000DM008-2FR102
\\.\PHYSICALDRIVE1 WDS500G3X0C-00SJG0 4 500105249280 WDS500G3X0C-00SJG0
\\.\PHYSICALDRIVE2 ATA HGST HTS721010A9 USB Device 1 1000202273280 ATA HGST HTS721010A9...
  1. 관리자 모드 PowerShell 에서 마운트할 Device ID를 마운트 한다.

--bare 를 사용해 마운트 여부를 확인할 수 있다.

1
PS> wsl --mount \\.\PHYSICALDRIVE2 --bare
  1. WSL 리눅스 터미널에서 디스크를 확인한다.

아래 같이 마운트를 실행한다.

1
2
3
4
PS> wsl --mount \\.\PHYSICALDRIVE2 -type ext4
디스크가 '/mnt/wsl/PHYSICALDRIVE2'(으)로 탑재되었습니다.
참고: /etc/wsl.conf에서 automount.root 설정을 수정한 경우 위치가 달라집니다.
디스크를 분리하고 분리하려면 'wsl.exe --unmount \\.\PHYSICALDRIVE2'을 실행하십시오.

파티션을 마운트 한다면

1
2
3
4
PS> wsl --mount \\.\PHYSICALDRIVE2 -p 1   # partition 1
디스크가 '/mnt/wsl/PHYSICALDRIVE2p1'(으)로 탑재되었습니다.
참고: /etc/wsl.conf에서 automount.root 설정을 수정한 경우 위치가 달라집니다.
디스크를 분리하고 분리하려면 'wsl.exe --unmount \\.\PHYSICALDRIVE2'을 실행하십시오.

연결된 디스크가 sdd 에 표시된다.

1
2
3
4
5
6
7
~$ lsblk
NAME MAJ:MIN RM SIZE RO TYPE MOUNTPOINT
sda 8:0 0 363.1M 1 disk
sdb 8:16 0 8G 0 disk [SWAP]
sdc 8:32 0 256G 0 disk /mnt/wslg/distro
sdd 8:48 0 931.5G 0 disk
└─sdd1 8:49 0 931.5G 0 part

어떠 파일 시스템인지 확인하려면 lsblk -f 명령을 사용한다.

1
2
3
4
5
6
7
8
~$ lsblk -f
NAME FSTYPE LABEL UUID FSAVAIL FSUSE% MOUNTPOINT
sda ext4
sdb swap 44bcbb9a-3a2c-44db-99e4-9c14dec69098 [SWAP]
sdc ext4 3255683f-53a2-4fdf-91cf-b4c1041e2a62 159.1G 32% /mnt/wslg/distro
sdd
└─sdd1 ext4 9b3c51ab-a49b-41c7-a105-fb9d47a86476
(3.11.1)qkboo@desktop-goyangi:~$

df 명령으로 확인해 보자,

1
2
3
4
5
6
7
8
9
10
s$ df -h
Filesystem Size Used Avail Use% Mounted on
none 16G 4.0K 16G 1% /mnt/wsl
drivers 465G 397G 69G 86% /usr/lib/wsl/drivers
none 16G 0 16G 0% /usr/lib/wsl/lib
/dev/sdc 251G 80G 160G 34% /

...

/dev/sdd1 917G 852G 19G 98% /mnt/wsl/PHYSICALDRIVE2p1

6. 배포본 이름 변경하기

  1. 먼저 모든 WSL 실행 배포본을 종료한다.

현재 배포본 Ubuntu 20.04 인데 do-os-relase 업그레이드로 22.04 로 완료된 상태이다. 하지만 배포본 이름은 20.04 라서 이름을 22.04 로 변경하려고 한다.

1
2
3
PS> wsl -l
Linux용 Windows 하위 시스템 배포:
Ubuntu-20.04(기본값)
  1. 레지스트리 편집기를 열고 다음 위치로 이동한다.

HKEY_CURRENT_USER\SOFTWARE\Microsoft\Windows\CurrentVersion\Lxss

  1. Lxss 항목 중 배포본 레지스트리를 선택하면 아래 같은 내용에서 *DistributionName 을 찾아 변경한 배포본 이름으로 바꾸고 저장한다.
  1. 변경된 이름을 저장하고 wsl 배포본 목록을 확인한다.
1
2
3
PS> wsl -l
Linux용 Windows 하위 시스템 배포:
Ubuntu-22.04(기본값)

— 참고

  1. WSL 시작하기: https://github.com/wslhub/wsl-firststep/