firewalld 를 이용해서 방화벽을 구성해 보자.
- RedHat, Ubuntu, OpenSUSE LEAP 15.0 등은 시스템 기본 파이어월 관리자로 firewalld 를 제공한다고 한다.
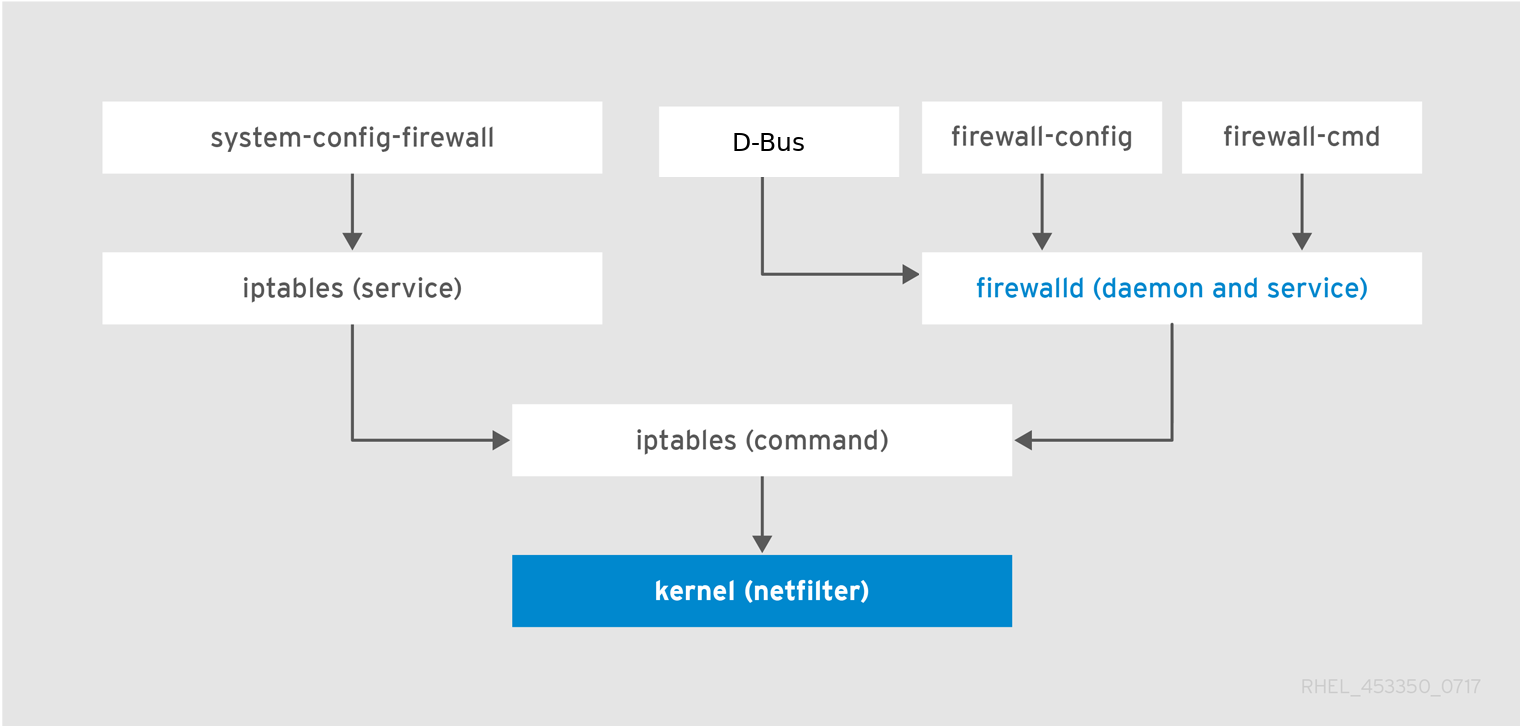
firewalld
firewalld 는 ….
firewalld는 ufw 처럼 iptables 을 구성할 수 있다.
네트워크를 지역 관리가 가능해서 다른 네트워크, 지역에 따라 다른 규칙으로 구성해서 사용할 수 있다.
For example “Home” and “Office” where all communications with local machines are allowed, and “Public Wi-Fi” where no communication with the same subnet would be allowed.
https://www.ctrl.blog/entry/ufw-vs-firewalld
firewalld 설치
OpenSUSE LEAP 15.0, RedHat, Ubuntu 등은 시스템 기본 파이어월 관리자로 firewalld 를 제공한다고 한다.
1 | $ sudo apt install firewalld |
Start firewalld
To start firewalld, enter the following command as root:
1 | systemctl start firewalld |
root 사용자로 시작한다.
1 | sudo systemctl enable firewalld |
For more information about the service status, use the systemctl status sub-command:
1 | sudo systemctl status firewalld |
Stop firewalld
To stop firewalld, enter the following command as root:
1 | systemctl stop firewalld |
To prevent firewalld from starting automatically at system start, enter the following command as root:
1 | systemctl disable firewalld |
To make sure firewalld is not started by accessing the firewalld D-Bus interface and also if other services require firewalld, enter the following command as root:
1 | systemctl mask firewalld |
사용해 보기
firewalld 는 명령라인 firewall-cmd 와 GUI로 firewall-config 명령을 지원한다.
Zone 설정
Get a list of all supported zones
1 | firewall-cmd --get-zones |
List all zones with the enabled features.
1 | $ firewall-cmd --list-all-zones |
기본으로 제공하는 Zone
- drop: Any incoming network packets are dropped, there is no reply. Only outgoing network connections are possible.
- block: Any incoming network connections are rejected with an icmp-host-prohibited message for IPv4 and icmp6-adm-prohibited for IPv6. Only network connections initiated within this system are possible.
- public: For use in public areas. You do not trust the other computers on networks to not harm your computer. Only selected incoming connections are accepted.
- external: For use on external networks with masquerading enabled especially for routers. You do not trust the other computers on networks to not harm your computer. Only selected incoming connections are accepted.
- dmz: For computers in your demilitarized zone that are publicly-accessible with limited access to your internal network. Only selected incoming connections are accepted.
- work
For use in work areas. You mostly trust the other computers on networks to not harm your computer. Only selected incoming connections are accepted. - home
For use in home areas. You mostly trust the other computers on networks to not harm your computer. Only selected incoming connections are accepted. - internal
For use on internal networks. You mostly trust the other computers on the networks to not harm your computer. Only selected incoming connections are accepted. - trusted
All network connections are accepted.
Zone
1 | sudo firewall-cmd --get-default-zone |
서비스
This command prints a space separated list.
Get a list of all supported services
1 | $ firewall-cmd --get-services |
This command prints a space separated list.
Get a list of all supported icmptypes
1 | firewall-cmd --get-icmptypes |
서비스를 제거하려면
1 | # firewall-cmd --zone=public --remove-service=http |
Http, Ssh 방화벽 활성화
http, https 를 공개 서비스를 지원하는 기본 존인 public에 추가한다.
1 | sudo firewall-cmd --add-service=ssh |
sudo firewall-cmd –zone=public –add-service=http –permanent
방화벽을 갱신한다
1 | firewall-cmd --reload |
혹은 zone을 지정해 추가한다.
1 | sudo firewall-cmd --zone=web --add-service=ssh |
Likewise, we can add the DNS service to our “privateDNS” zone:
1 | sudo firewall-cmd --zone=privateDNS --add-service=dns |
Zone 에 구성한 서비스 등은 런타임 혹은 완전히 방화벽에 구성할 수 있다.
To change settings in both modes, you can use two methods:
Change runtime settings and then make them permanent as follows:
1 | firewall-cmd <other options> |
Set permanent settings and reload the settings into runtime mode:
1 | firewall-cmd --permanent <other options> |
모든 구성 내용 확인:
1 | $ sudo firewall-cmd --list-all |
특정 zone 에 대한 내역을 출력한다:
1 | $ sudo firewall-cmd --zone=public --list-all |
참조
https://www.linode.com/docs/security/firewalls/introduction-to-firewalld-on-centos/