Raspberry Pi : Install Raspbian
Install Rasbperry Pi OS 글타래는 아래 같이 구성되며 OS 설치, Service 구성 및 사용에 대해 작성한다.
- Raspberry Pi 설치준비
- Install Raspbian OS
- Managing Service daemon
- Basic OS Security for Server
- Install & Configuration - Nginx, Node JS, Jupyter
2017-10-30: swap 추가, timezone 수정
{:.right-history}
Install Raspbian OS
Raspberry Pi(라즈베리파이)에 Raspbian, Ubuntu 등을 설치하고 Serial Console 을 이용해서, 라즈베리파이를 처음 설정하고 SSH 구성을 활성화 하겠다.
라즈베리파이에 OS를 설치하기 위해서는 NOOBS를 사용하거나 오에스 이미지를 다운받아 SD Card에 구워서 사용한다. 라즈베리파이는 다음과 같은 OS 배포본을 사용할 수 있다.
| 운영체제 | 특징 |
|---|---|
| Raspbian (Debian) | Raspberry Pi + Debian의 합성어, 가장 범용 OS. |
| Arch Linux (A non-Linux Distribution) | ARM 프로세서를 지원하는 Arch Linux |
| RISC OS | ARM 프로세서를 위한 실시가(RTOS) 운영체제 |
| OpenElec | XBMC 미디어 센터 지원을 위한 운영체제 |
| RaspBMC | XBMC 미디어 센터 지원을 위한 운영체제 |
| Pidora | Pi + Fedora 운영체제 |
**Raspbian(라즈비안)**은 라즈베리파이를 위한 데비안 리눅스로 가장 대중적인 데비안 리눅스, 우분투와 같은 사용자 경험을 제공해 주고 있다.
Raspberry Pi 준비
설치에 앞서 준비해야 할 것 이 있습니다.
- Raspberry Pi 1, 2, 3
- OS 설치 SD Memory Card: 8GB 이상, Class6 이상
- USB to Serial Cable
SDCard에 대해
라즈베리파이는 SD 호환 카드에서 작동하도록 되어 있다.
NOOBS를 이용한다면 최소 8GB
다른 버전은 최소 4GB
Class 4는 4MB/s 쓰기 속도, Class 10은 10MB/s 쓰기가 가능하지만 Class 10이 Class 4를 앞선다는 것을 보장하진 않는다. 라즈베리파이는 Class 6의 8GB 사용을 권장하고 있다.
Mac: SDCardFormatter
SDCard 사용시 주의
- 정품 SD Card 사용을 권장
- 전원은 품질이 좋아야. 라즈베리파이 보드의 TP1, TP2 전력을 측정해서 4.75v 이하면 품질이 좋은 전원으로 바꾸길.
- 더불어 좋은 품질의 USB 케이블을 사용해야 한다.
- 종료시 sudo halt 를 이용하도록
- 오버클록은 지양하도록
### Download and Install
OS 설치와 서비스 설치는 크게 아래 과정을 거친다.
- (1). Download OS Image, Etcher, sdFormatter
- (2). OS image 파일을 SD Card에 쓴다.
SD Card로 부팅후에
- (1). 모니터 혹은 시리얼 콘솔에서
raspi-conifg로 시스템 구성을 마무리 - (2). 서비스 설치
(1). Download OS Image, Etcher, sdFormatter
라즈베리안 OS를 다운로드,
Raspberry Pi Raspbian Download 링크에서 다운 받을 수 있다.
토렌트와 zip 형식으로 다운 받을 수 있습니다.
다운로드된 파일은 yyyy-mm-dd-raspbian-wheezy.zip 형식으로 다운로드가 된다. 디스크 이미지 파일 yyyy-mm-dd-raspbian-wheezy.img 이 zip으로 압축되어 있는데,이 이미지 파일을 SD Card에 복사해야 한다.
디스크 이미지를 쓰기위한 프로그램으로 오에스 이미지를 SD Card, Disk 등에 쓴다. 보통 아래 프로그램을 이용한다.
- Windows : Win32DiskImager
- Linux: ImageWriter
- macOS:
dd명령 - 모든 플랫폼: Etcher
- SD Memory Card Formatter 5.0 for SD/SDHC/SDXC
이 글에서는 디스크 이미지 쓰기Etcher 프로그램을 이용해서 오에스 이미지 파일을 SD Card에 쓰겠다.
macOS, Windows, Linux 지원
여기까지 필요한 준비 사항은:
- Raspbian OS Image
- SD Card Formatter
OS image 파일을 SD Card 쓰기
Etcher를 실행하고
 {:width=”640”}
dd 를 사용한다면,
다운받은 .zip 파일을 unzip으로 풀어 dd`로 SD Card에 이미지를 쓴다.
1 | unzip -p 2017-06-21-raspbian-stretch-lite.zip | sudo dd of=/dev/rdisk1 bs=4M; sync |
MacOS는 dd의 bs 옵션이 소문자로 받는다:
bs=4m
다쓴 SD Card를 마운트 한다.
ssh 활성화
Raspbian 2016-11-25일 릴리즈 이후 기본으로 ssh가 비활성화 되어 있다. 그래서 처음 부팅후 ssh 접속이 필요하다면 부트 파티션에 ssh 파일을 생성해 주면된다.
1 | $ cd /boot |
#### Serial console
여기서는 Serial console에서 네트워크 확인 및 초기 설정을 하고 ssh 로 서버에 로그인해서 시스템 구성을 진행한다.
SD Card를 라즈베리파이에 꽃고 HDMI, Keyboard 및 Mouse 가 별도로 준비되어 있으면 직접 모니터를 보고 작업을 진행하면 좋다.
USB to Serial 케이블을 사용해서 Raspberry Pi의 Serial Console에 연결한다.
 {:width=”640”}
그리고 시리얼 포트를 통해 tty 연결을 위해 터미널 프로그램에서 baud rate 115200 으로 연결한다. 아래는 macOS의 screen CLI 명령으로 usb serial 포트에 연결하고 있다.
1 | $ screen /dev/cu.usbserial 115200 |
이제 SD Card를 넣고 부팅을 하면, 터미널에 부트 단계가 진행되고 처음 5분 정도 소요된다.
 {:width=”640”}
Raspberry Pi를 위한 이미지는 처음 계정은 root/linux 이다.
터미널에서 uname 은 aarch64 임을 확인 할 수 있다.
1 | root# uname -a |
처음으로 라즈베리파이에서 64bit 환경으로 운영해 볼 수 있게 됐다.
Raspbian OS Image 복사
맥/리눅스에서 dd 명령을 이용해서 이미지를 복사할 수 있습니다.
sudo dd bs=1m if=path_of_your_image.img of=/dev/diskn
- bs: 한번에 읽어들일 사이즈를 의미
마지막 옵션인 ‘diskn’의 n은 SD Card의 번호로 SDCard Formater에서 기억하란 번호입니다. 여기서 번호가 2로 가정합니다.
그리고 Mac OSX는 디스크가 /dev 경로에 두 가지 종류가 있습니다.
- /dev/disk# 버퍼 디바이스로 데이터가 부가적인 처리를 통해 사용합니다.
- /dev/rdisk# 저수준 경로로 빠르고 dd 명령을 사용할 때 완벽합니다.
Class 4 SD card는 rdisk 경로를 사용할 때 20배 빠릅니다.
먼저 포맷터로 포맷한 디스크 마운트를 해제합니다. 맥의 디스크유틸리티를 이용해서 마운트를 해제합니다.
이미지가 있는 곳에서 dd 명령으로 라즈비안을 복사합니다.3.2GB 크기를 복사해서 9분~15분 정도의 시간이 소요됩니다.
zip 압축 파일을 입력으로 다음 같이 dd 명령으로 sd card에 쓴다.
1 | $ unzip -p 2016-05-27-raspbian-jessie.zip | sudo dd of=/dev/rdisk1 bs=1m |
압축을 푼후
1 | $sudo dd bs=1m if=2015-02-16-raspbian-wheezy.img of=/dev/rdisk2 |
rdisk 이용시 에러가 발생하면 disk를 사용합니다.
다음 링크에 설명한 방법을 바탕으로 설명해보겠습니다.
참조: http://elinux.org/RPi_Easy_SD_Card_Setup
Mac diskutil 과 dd 이용
diskutil로 디스크 목록 확인해 SD카드 번호 확인
1 | diskutil list |
1 | diskutil unmountDisk /dev/disk1 |
이미지 쓰기
1 | $ sudo dd bs=1m if=image.img of=/dev/rdisk[n] conv=noerror,sync |
위 명령으로도 ‘Permission Denied’ 가 나오면, 이것은 SD 카드의 파티션 테이블이 덮어쓰기를 막고 있다는 의미로 이 경우 파티션 테이블을 제거해야 한다. 다음 같이 zero로 SDCard를 덮어쓰면 all partitions, master boot records, and data를 지운다.
진행 상황을 보려면 status=progress 로 알 수 있다.
1 | $ sudo dd bs=1m if=image.img of=/dev/rdisk[n] conv=noerror,sync status=progress |
SD card를 포맷하려면
1 | $sudo dd if=/dev/zero of=/dev/rdisk1 bs=4k count=1 |
- bs: 한번에 읽어들일 byte를 의미
- count: block 수 입니다.
혹은 랜덤 데이터로 지우려면
1 | $dd if=/dev/urandom of=/dev/sda bs=4k |
Mac의 diskutil을 사용하면
1 | sudo diskutil partitionDisk /dev/disk3 1 MBR "Free Space" "%noformat%" 100% |
다운로드한 이미지는 zip 압축 파일로 저장된다. 다음 같이 명령 파이프를 이용하면 압축 파일을 풀지않고 디스크에 이미지를 쓸 수 있다.
1 | $ unzip -p 2016-09-23-raspbian-jessie.zip* | sudo dd of=/dev/rdisk1 bs=4m |
이미지를 dd 명령으로 작성한 후에 카드를 추출한다:
1 | sudo diskutil eject /dev/rdisk3 |
https://www.raspberrypi.org/documentation/installation/installing-images/mac.md
clone disk
1 | $ sudo dd if=/dev/diskX conv=sync,noerror bs=4m | gzip -c > /path/to/backup.img.gz |
반대로 디스크를 디스크이미지로 만들려면 다음 같이 dd 를 사용할 수 있습니다.
쓰기 전에 sd card의 마운트한 파티션을 마운트를 해제해야 합니다.$sudo dd bs=1m if=2015-02-16-raspbian-wheezy.img of=/dev/rdisk2
SDFormatter 이용
SDCard Formatter 를 이용해서 SD Card를 포맷할 수 있습니다. 윈도우즈, 리눅스 및 맥을 지원합니다.
- 오에스에 맞는 버전을 다운로드하고 실행하면 설치를 합니다.
- SD Card를 컴퓨터에 삽입합니다.
- SDFormatter를 실행하고 다음 화면 처럼 SD card를 포맷할 수 있습니다.
- SDFormatter 라는 프로그램을 설치하여, 옵션의 FORMAT SIZE ADJUSTMENT 설정을 ON 으로 하여 SD카드를 포맷
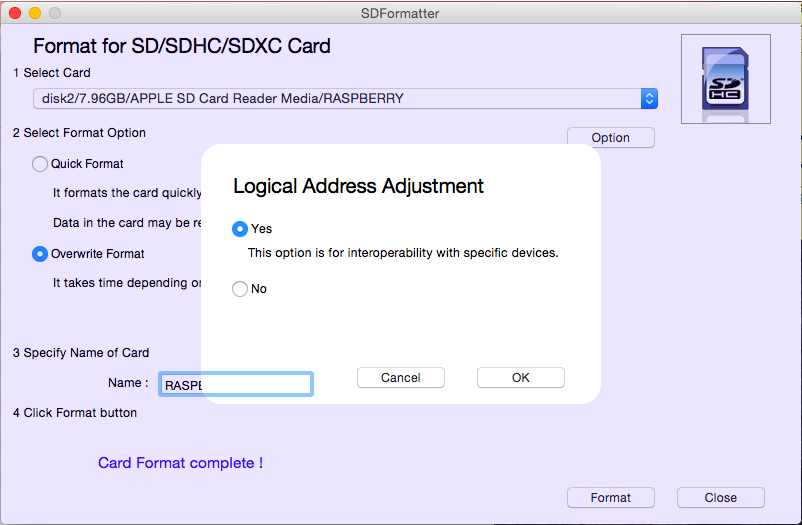
SDCard Formatter에서 디스크 선택시 디스크 번호를 잘 기억해 두세요.
윈도우즈에서 라즈비안 복사하기
윈도우XP/7/8 에서 다운로드한 라즈비안 OS를 SD카드로 복사하겠습니다. 아래 링크에서 ‘Win32 Disk Imager’를 다운받아 사용해야 합니다.
win32diskimager를 실행하고 다운받은 ‘2015-03-15-raspbian-wheezy.zip’ 파일을 선택하고 SD카드 위치를 선택해 주면 됩니다.

그리고 Write버튼을 눌러주고 기다리면 복사를 시작합니다.
부팅
IP 강제 지정
CD Card를 마운트 하면 boot 파티션이 마운트 된다. boot 파티션에 있는 cmdline.txt 에 ip= 옵션을 추가해 강제로 IP 주소를 지정할 수 있다.
1 | dwc_otg.lpm_enable=0 console=ttyAMA0,115200 console=tty1 root=/dev/mmcblk0p2 rootfstype=ext4 elevator=deadline rootwait **ip=192.168.0.203** |
Serial Console

Raspbian 은 boot 파티션에 있는 cmdline.txt 옵션으로 기본적으로 serial console을 사용하도록 하고 있다.
1 | dwc_otg.lpm_enable=0 console=ttyAMA0,115200 console=tty1 root=/dev/mmcblk0p2 rootfstype=ext4 elevator=deadline rootwait |
Mac Serial
보통 FTDI USB 케이브을 다음 두 제품이 대부분이다.
- Prolific PL2303: PL2303 MacOSX
- FTDI USB Serial: FTDIUSBSerialDriver_v2_3.zip
macOS Maverick 이후 FTDI 드라이버가 포함되어 있다.
혹시 새 버전을 설치하거나 이전 버전이 설치되어 삭제하려면 [^6]
2
3
$ sudo rm -r PL2303.kext
$ sudo rm -r ProlificUsbSerial.kext
FTDI 케이블을 사용한다고 가정하고 맥에 USB to Serial 케이블을 연결하면 /dev 장치에 cu., tty. 장치 드라이버가 생성된다. 두 장치는 다른 점이 있다.[^5]
- /dev/tty.* 장치는 DCD (data-carrier-detect) 신호를 대기한다, 이것은 누군가 호출해 온다는 의미이다.
- /dev/cu.* 장치는 DCD를 추정하지 않고 항상 즉시 연결한다(응답 혹은 성공)
FTDI 로 시리얼을 사용시는 cu. 장치를 사용하면 된다.
일반적으로
screen
Mac에서 screen 사용시
1 | screen /dev/cu.usbserial-XXXXXXXX 115200 |
시리얼 터미널에서 빠져나오려면 ‘ctrl-a, ctrl-' 를 순서데로 입력
Linux Serial terminal
Linux machine에서 Usb to serial 케이블을 사용할 수 있는지 콘솔 메시지에서 Serial console이 있는 지 확인한다.
1 | $ dmesg | egrep --color 'serial' |
장치 드라이버는 보통 /dev/ttyUSB0 장치로 연결된다.
1 | $ ls /dev/ttyUSB* |
dterm
dtermAUR is a tiny serial communication program. If you invoke it without parameters, it will connect to /dev/ttyS0 at 9600 baud by default. The following example connect to /dev/ttyS0 at 115200 baud, with 8 data bits, no parity bit and 1 stop bit-times:
1 | $ dterm 115200 8 n 1 |
See its homepage[1] for more examples.
Minicom
minicom can be obtained from the official repositories. Start Minicom in setup mode:
1 | $ minicom -s |
Using the textual navigation menu, change the serial port settings to the following:
1 | Serial Device: /dev/ttyS0 |
Press Enter to exit the menus (pressing Esc will not save changes). Remove the modem Init and Reset strings, as we are not connecting to a modem. To do this, under the Modem and Dialing menu, delete the Init and Reset strings. Optionally save the configuration by choosing save setup as dfl from the main menu. Restart minicom with the serial cable connected to the target machine. To end the session, press Ctrl+A followed by Ctrl+X.
picocom
picocom is a tiny dumb-terminal emulation program that is very like minicom, but instead of mini, it is pico. The following example connect to ttyS0 at 9600 bps:
1 | $ picocom -b 9600 /dev/ttyS0 |
Note: if the backspace key won’t work properly try out this option: ‘–omap delbs’
See its manual for detailed usage.
Screen
screen is able to connect to a serial port. It will connect at 9600 baud by default:
1 | $ screen /dev/ttyS0 115200 |
To end the session, press Ctrl+a followed by k.
여러 사용자로 열려면 -R 옵션을 주고 다시 연다
1 | screen -R /dev/tty.usbserial-XXXXXXXX 115200 |
screen 명령 사용중 어떤 상황에서 세션이 멈춘 경우 종료 명령이 안된다. 이 경우 screen 세션을 찾고 가제 종료를 시도해 본다.
Type screen -list to identify the detached screen session.
1 | ~$ screen -list |
Get attached to the detached screen session
screen -r 20751.Melvin_Peter_V42
Once connected to the session press Ctrl + A then type :quit
Attached session 종료
1 | $ screen -ls |
screen -S sessionname -p 0 -X quit
참고
http://www.mostlynetworks.com/2014/11/os-x-yosemite-prolific-usb-drivers/
http://www.mostlynetworks.com/2015/01/fixing-prolific-driver-os-x/
https://wiki.archlinux.org/index.php/disk_cloning
[^5]: Mac tty
[^6]: Uninstall PL-2303 on macOS X
Raspberry Pi : Install Raspbian
https://blog.thinkbee.kr/raspbian-2-os_install-0291355d691f/