Open API Web Token
Open api key
API keys는 사용자 인증, 요청 API 호출을 위해 필요하다.
보통 RESTFull API 호출시 API keys 와 인증 스킴을 사용한다. 주요 차이는:
- API keys : 앱 혹은 사이트 호출을 식별해서 API 호출을 만다.
- Auth tokens : 앱 혹은 사이트 사용자를 식별한다.
이런 인증에 두가지 방식을 사용한다.
- Session-based Authentication
- Token-based Authentication
Token based Authentication
토큰 기반 인증은
- Stateless Authentication 이 큰 이유이다. 클라이언트 측 로컬 스토리지 (혹은 세션, 쿠키 가능)에 저장된다.
- 좋은 예는 싱글 페이지 앱, Web ApIs, IoT가 있다
- 앱이 확장성이 있고 분리되야 한다면, Token 기반이 좋은 사례가 된다.
Stateless Authentication: 인증에 대해 서버측이 인증 정보를 보존하지 않는다.
JWT
JWT(JSON Web Tokens)는 REST API를 사용한 간단하고 보안이 적용된 인증 전략이다. 웹 인증을 위한 표준이고 JSON token 요청을 기반으로 한다. 인증 서버에서 발급한 토큰을 클라이언트가 요청시 마다 헤더에 토큰을 넣어 요구해야 한다.
MEAN 스택 앱에 빠르게 인증을 추가하는 것은 JSON Web Token 을 사용할 수 있다.
How JWT Works?
Node Js JWT Authentication Tutorial From Scratch
JSON Web Token is the token; we need to put the header in every request to verify the client. The Architecture of JWT Authentication is pretty darn simple.
- First user attempt to login with their credentials.
- After server verifies the credentials, it sends JSON Web Token to the client.
- A client then saves that token in local storage or any other storage mechanism.
- Again if a client wants to request a protected route or resource, then it sends JWT in a request header.
- The server verifies that JWT and if it is correct then return a 200 response with the information, client needs.
- If the JWT is invalid, then it gives unauthorized access or any other restricted message.
- Node js JWT Authentication
In this tutorial, we are not using any front-end framework. We will use POSTMAN to request the server. We will check the auth using token. So let us get started.
Step 1: Install node js dependencies.
Create one project folder and go into that folder. Type the following command.
1 | npm init |
Now, install the following dependencies.
1 | npm install express jsonwebtoken mongoose body-parser --save |
It will install the express web framework, jsonwebtoken package to authenticate the user, mongoose schema model, and body-parser middleware.
Also, we need to install the nodemon development server to prevent the stop and restart the server process. So let us do that first.
1 | npm install nodemon --save-dev |
Rest dependencies we will install as our project grows.
Step 2: Configure the Node Server.
In the package.json file, change this object to the following.
1 | "scripts": { |
So in the terminal when we type npm start command, we bootstrap the server.js file.
In the root folder, make one file called server.js. Configure the node server.
1 | // server.js |
Now, go to terminal and hit the following instruction.
1 | npm start |
It will start the server, you can see it on a console. So it is ready to consume any request, either web or API.
Step 3: Send a request to node server via Postman.
First, we define one route and send the JSON response to the client.
1 | // server.js |
Open the Postman and send the get request to http://localhost:3000/checking. Postman Tutorial
Step 4: Configure the MongoDB Database.
Write the following code to connect the Node.js application to the MongoDB database.
if below mongoose 3.x,
1 | // server.js |
Then use above mongoose 4.x, prepare Promise and connect().
1 | // Mongodb |
Also, write the body-parser middleware to the application.
1 | // server.js |
Step 5: Create a User model.
Create one new folder inside root called models. In that, create one file called user.model.js file.
1 | // user.model.js |
We have defined the schema for the User collection.
Step 6: Create the routes for users.
In the root, make one folder called routes. In that folder, create one file called user.route.js. Now we need to sign the user up for our application. So let us define the post route to signup the user. We also need a bcrypt module to hash the password. We can not store the plain password. So let us install bcrypt module first.
1 | npm i bcrypt |
Next, write the following code into the user.route.js file.
1 | // user.route.js |
What it does is that it tries to hash the incoming request’s password property. If it fails to do so then returns a response with an error in json format. If it successes then it will create a new user and add that to the MongoDB database. Now include this user.route.js file in the server.js file. I am writing the whole file now.
1 | // server.js |
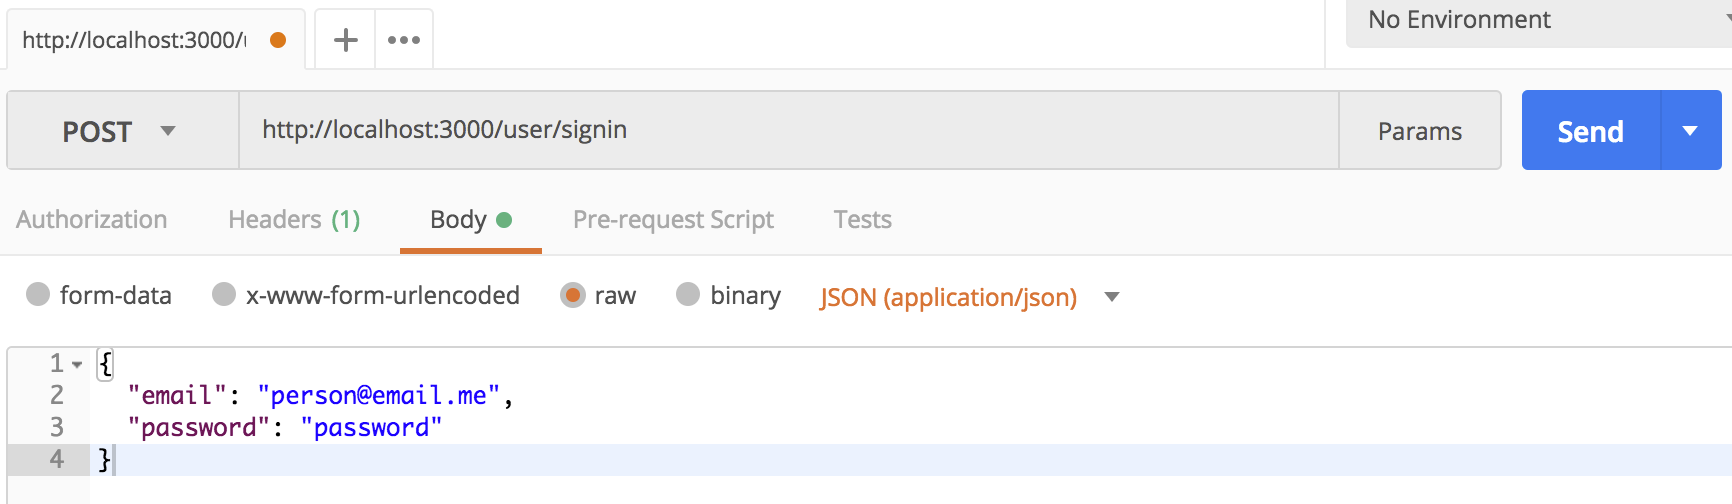
Step 7: Send a post request from the Postman.
postman 에서 POST 방식으로 새 사용자를 추가해 보자, POST에서 Body를 Raw 이고 형식은 json(application/json) 를 선택하고 작성한다.
1 | { |
 {:width=”500”}
You can see here, I have created user successfully. Now, I am using Studio 3T for MongoDB. So here is the newly created user in the database.
이제 실제 암호화된 비밀번호로 생성된 사용자 정보를 확인할 수 있다.
 {:width=”500”}
MongoDB Tutorial With An Example
Step 8: Sign In the User.
사용자가 생성되고 비밀번호로 bcryp로 비밀번호가 생성되면 bcrypt.compare() 를 사용해 사용자 비밀번호를 인증할 수 있다.
1 | // user.route.js |
사용자 이메일로 허가된 사용자인지 인증하는데, 이메일이 존재하지 않으면 401 unauthorized access 에러를 출력한다.
 {:width=”500”}
First, I have checked if the user’s email exists or not. If not then return 401 unauthorized access. If email is there then check the password with bcrypted database password if match found then welcome to the JWT auth else 401 unauthorized access.
이메일로 사용자 검색이 되고 비밀번호 인증이 되면 환영 JWT auth를 반환하고 아니면 401 unauthorized access 를 반환하게 한다.
Step 9: Return the JWT, if auth attempt successful.
사용자 증명인 이메일과 패스워드가 유효하면 JWT token을 반환하도록 하자, jwt.sign() 함수는 기본으로 HMAC SHA256 해시 코드를 발생한다.
1 | jwt.sign({ |
다른 알고리즘이 필요하면 algorighm 속성을 제시해 준다.
1 | jwt.sign({ |
If the user’s credentials email and password are valid then in response, we need to return a JWT token. So let us generate the token and return to the user.
1 | // user.route.js |
JWT Token의 형식은 HEADER, PAYLOAD, SECRETKEY 조합으로 아래 같다:
The format of JWT Token is as following.
HEADER: ALGORITHM & TOKEN TYPE
1 | { |
PAYLOAD:DATA
1 | { |
VERIFY SIGNATURE
1 | HMACSHA256( |
조합으로 생성한 JWT는 아래 같은 JWT Token을 반환한다.
So it is a combination of header, payload, and secretkey, we are providing. Remember, You need to define your secret key in your environment variable file. I have just shown here for the demo purpose. So it will produce the following JWT token.
1 | eyJhbGciOiJIUzI1NiIsInR5cCI6IkpXVCJ9.eyJlbWFpbCI6ImtydW5hbGxhdGhpeWExMEBnbWFpbC5jb20iLCJfaWQiOiI1YTdjOWJkOGZjM2U1MDFjOTRhYTYwMzUiLCJpYXQiOjE1MTgxMjAxMjQsImV4cCI6MTUxODEyNzMyNH0._6qVGQV_KYlonawnaTHG-OhOJLV4tgD-Eob5iRz89AM |
이 토큰을 제한된 자원에 접근하는 앱에 사용할 수 있다.
Now use this token to access the protected resources to your application and we are done here. So this is how you can generate the JWT Auth Token.
JWT Token verifying
jwt.verify()를 사용해 발급한 토큰이 허용되는지 검증할 수 있다.
jwt.verify(token, secretOrPublicKey, [options, callback])
token: 발행된 Json Web TokensecretOrPublicKey: 토큰 발행시 제공한 시크릿 키
1 | router.post("/verify", function (req, res) { |